
You saved the photo. Soft claw clip twist, a few pieces falling around the face, the kind of hair that looks like it took two minutes. Then you tried it and it looked nothing like the pin. The clip slid out, the pieces looked stringy, and the twist fell flat by second period.
Most Pinterest hair does take two minutes. It also takes knowing the one small move the photo does not show you: where to pull the pieces from, which way to twist, how loose to leave the base.
These aesthetic hairstyles for long hair cover the looks all over your feed right now. Claw clips, ribbons, bubble ponytails, sleek buns, heatless curls, and braids that look soft instead of tight. Each one has steps, the time it takes, and the tip that makes it look like the pin.
Long hair is the best canvas for all of them. Start with the claw clip twist and the bow half up. You can do both tonight with things already on your desk.
Add a few bobby pins that match your hair color, a fine tooth comb for parts, and a small hair brush you can carry in your bag. That covers every style below.
1. Messy Claw Clip Twist
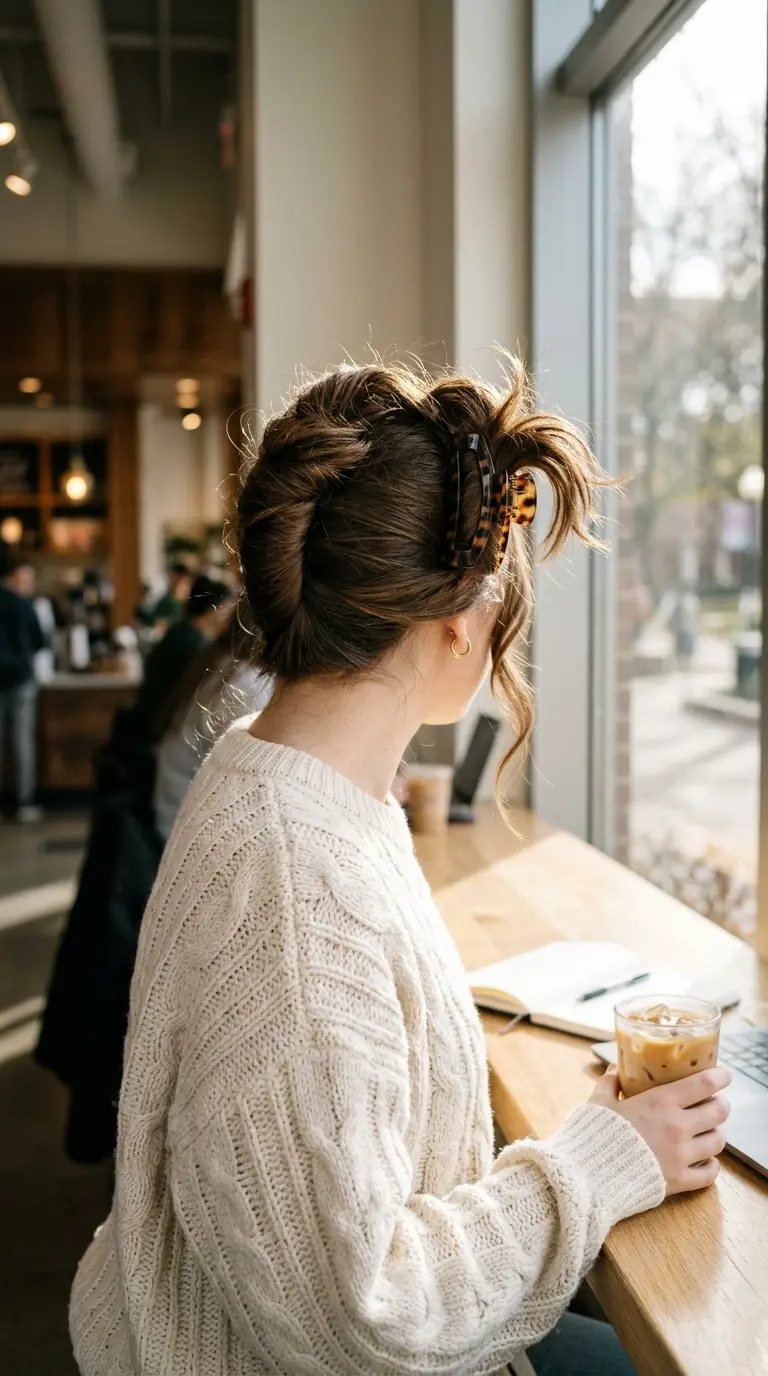
This is the look behind half the hair pins on your feed. It holds long hair up all day, it looks better slightly messy, and you can redo it in a school bathroom in thirty seconds.
- Pull two thin pieces out at the front, one by each cheekbone.
- Gather the rest of your hair at the nape as if making a low ponytail.
- Twist the whole length tightly in one direction.
- Fold the twist up against the back of your head.
- Open a large claw clip and push it in over the twist, teeth facing down.
- Let the ends spill out over the top of the clip and loosen the crown with your fingers.
Quick tip: twist up tighter than feels right. A loose twist slides down in an hour, but a tight one gets locked in place by the clip teeth.
2. Coquette Bow Half Up
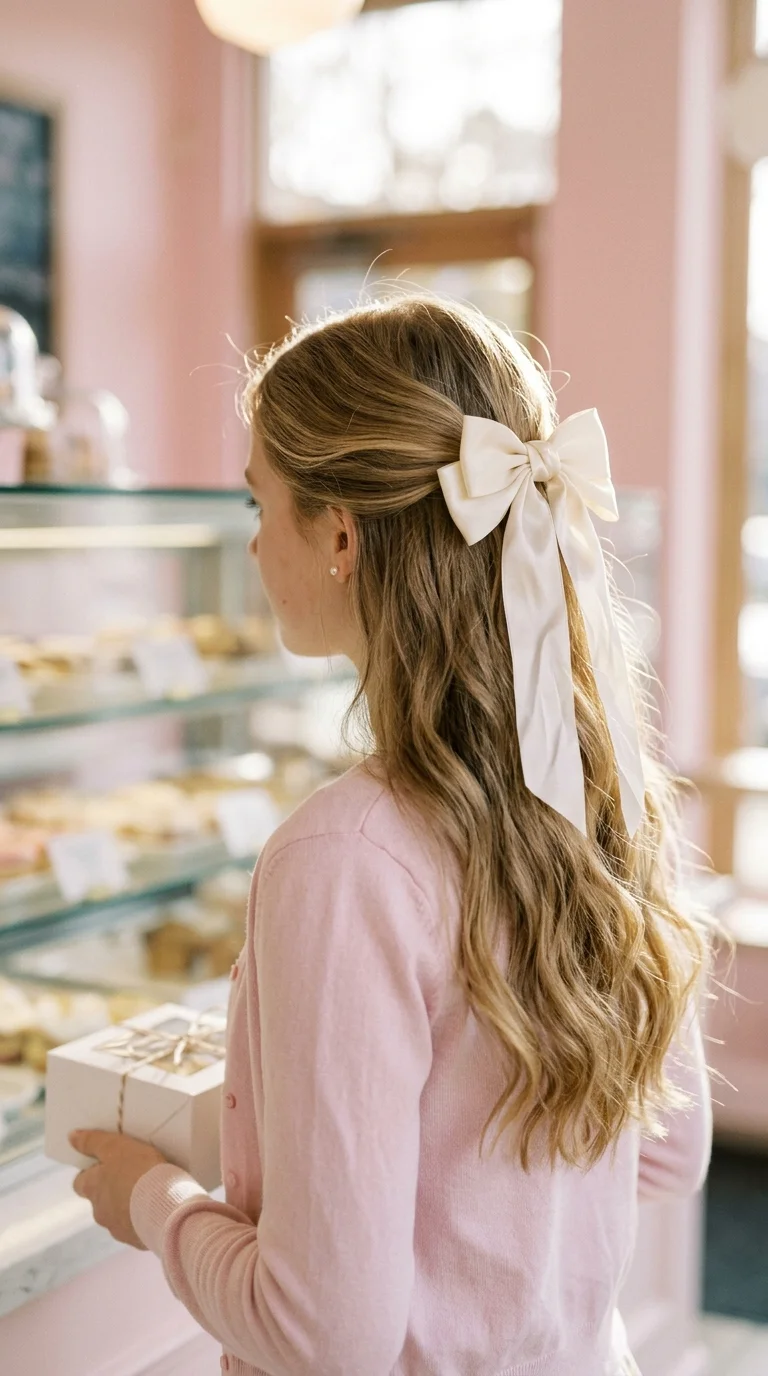
A big ribbon turns a plain half up into the soft, romantic look that fills every coquette board. The bow does the work, so the hair underneath can stay simple.
- Brush your hair smooth and add loose waves if you want extra softness.
- Take a section from temple to temple across the top of your head.
- Tie it at the back with a clear elastic.
- Loop a ribbon under the elastic so both tails are even.
- Tie a bow, pulling the loops to the same size.
- Trim the ribbon tails at an angle so they fall to your mid back.
Quick tip: tie the bow over the elastic, not above it. A bow sitting higher than the elastic flops forward and shows the hair tie underneath.
3. Face Framing Front Braids
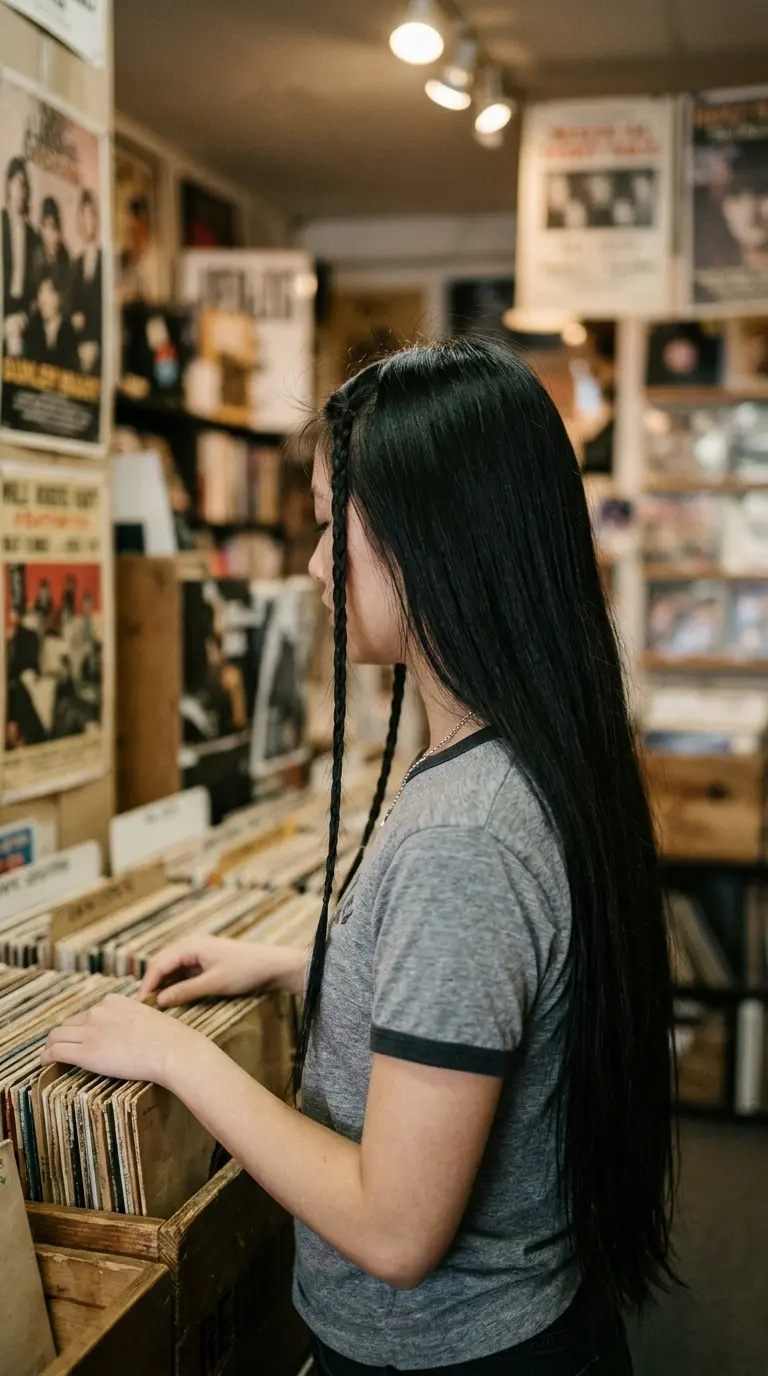
Two thin braids at the front is the fastest Y2K look there is. Everything else stays down, so it works on day two hair too.
- Part your hair down the center.
- Take a half inch section right at the front hairline on one side.
- Braid it into a tight three strand braid all the way down.
- Tie the end with a tiny clear elastic.
- Repeat on the other side, matching the starting point.
- Leave the rest of your hair straight or add a light bend.
Quick tip: start each braid right at the hairline, not behind it. Braids that start an inch back look like an accident.
4. Bubble Ponytail
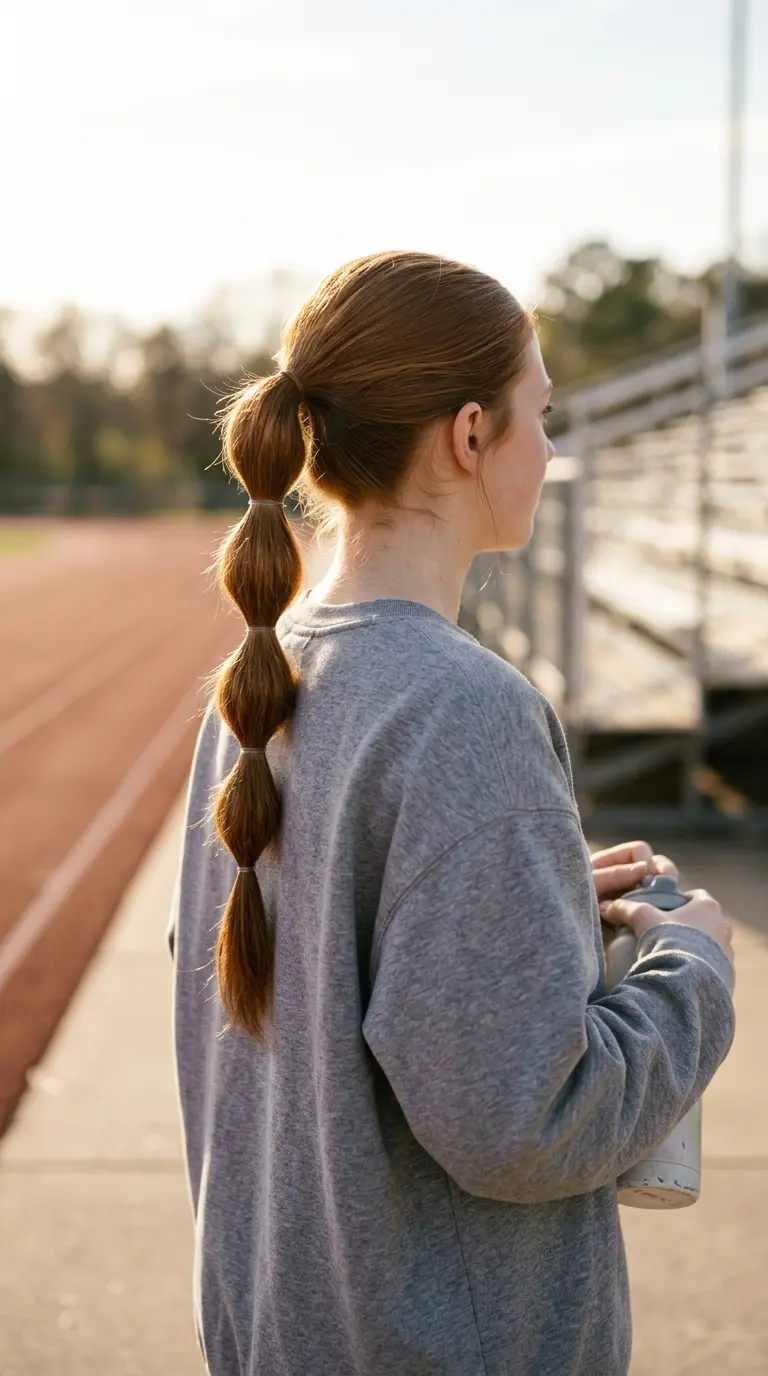
Bubble ponytails look fun, stay put through gym class, and make long hair look even longer. They need nothing but elastics.
- Brush your hair into a high ponytail and tie it tight.
- Place a clear elastic two to three inches below the first one.
- Pull gently at the hair between the two elastics to puff it out.
- Add the next elastic the same distance down.
- Keep going until you are a few inches from the ends.
- Wrap a thin piece of hair around the top elastic and pin it underneath.
Quick tip: keep every bubble the same size. Measure with two fingers between elastics and the ponytail looks neat instead of lumpy.
5. Clean Girl Sleek Low Bun
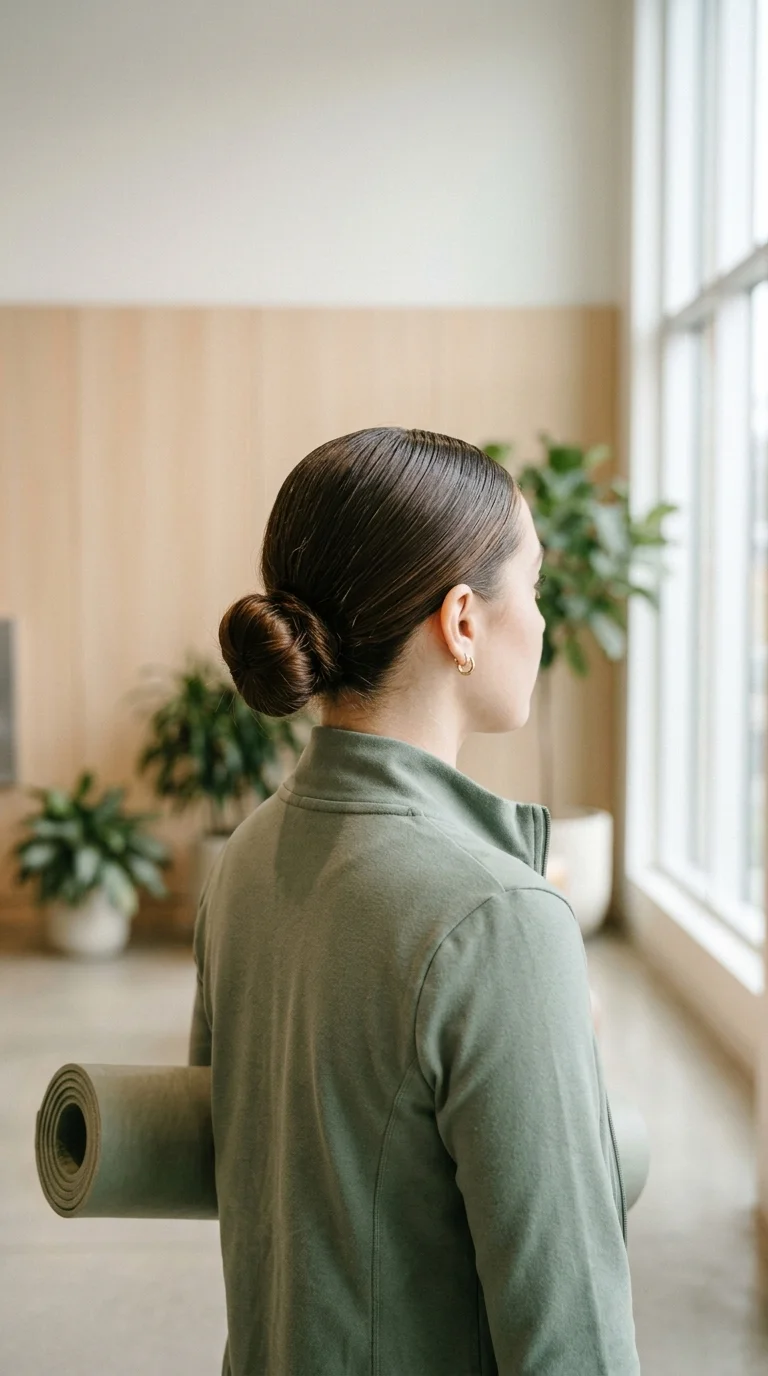
The clean girl bun is all about shine and a sharp part. It looks polished with zero effort and keeps long hair out of the way for a whole day.
- Start with damp or freshly brushed hair.
- Make a sharp center part with the tail of a comb.
- Smooth a little gel or styling cream over the sides and top.
- Brush everything back into a low ponytail at the nape and tie it.
- Twist the ponytail and wrap it around the elastic.
- Pin the bun with four bobby pins and finish with a light mist of hairspray on a toothbrush over the part.
Quick tip: brush with a boar bristle brush, not a paddle brush. It pushes the hair flat and removes the bumps a paddle brush leaves.
6. Half Up Space Buns
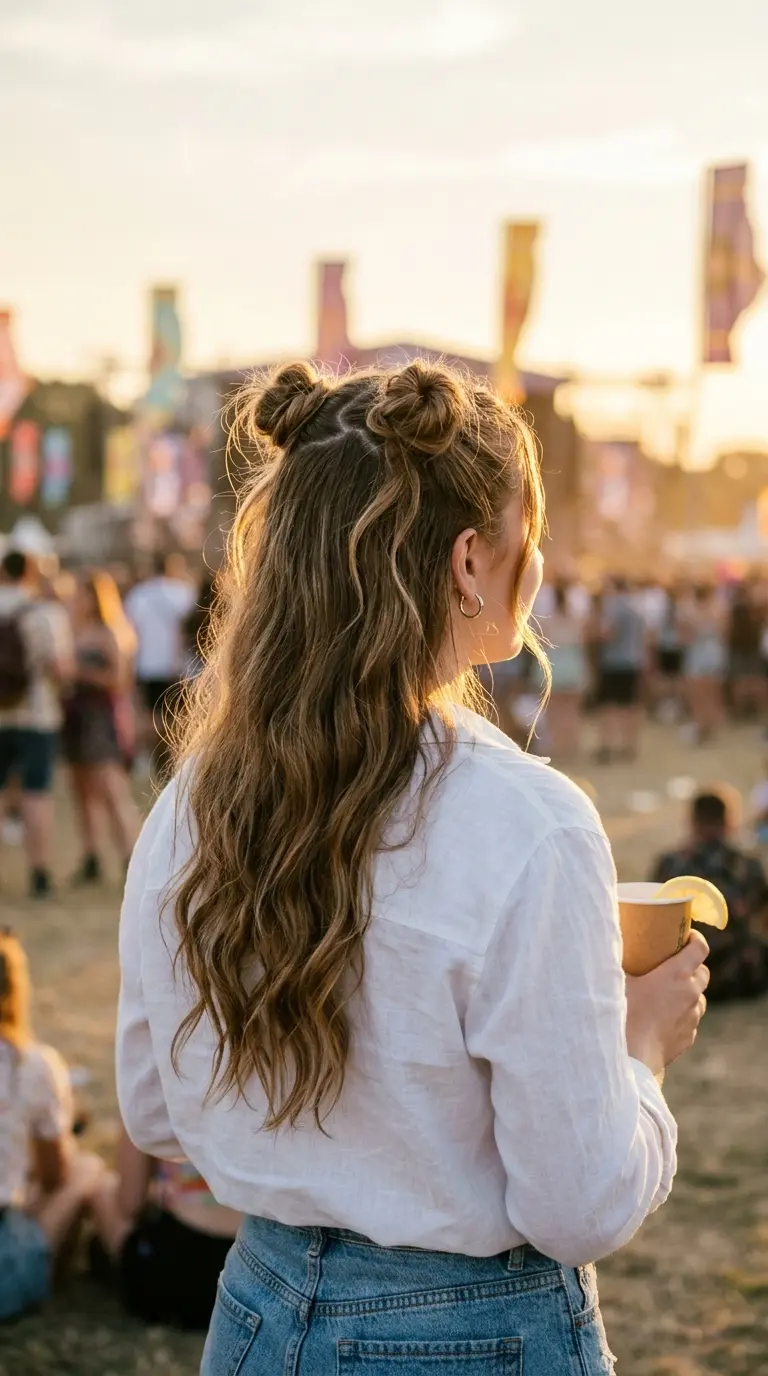
Space buns with the rest of the hair down feel playful without hiding your length. They are the go to for concerts, fairs, and any day you want a bit of fun.
- Make a center part, or a zigzag part with the tail of a comb.
- Take a section on one side of the crown, about the size of your palm.
- Twist it and wrap it around itself into a small bun.
- Secure the bun with an elastic and two pins.
- Repeat on the other side at the same height.
- Pull a few wisps loose from each bun so they look soft.
Quick tip: check the height in the mirror with a hand mirror behind you. Uneven space buns are the one thing everyone notices.
7. Heatless Sock Curls
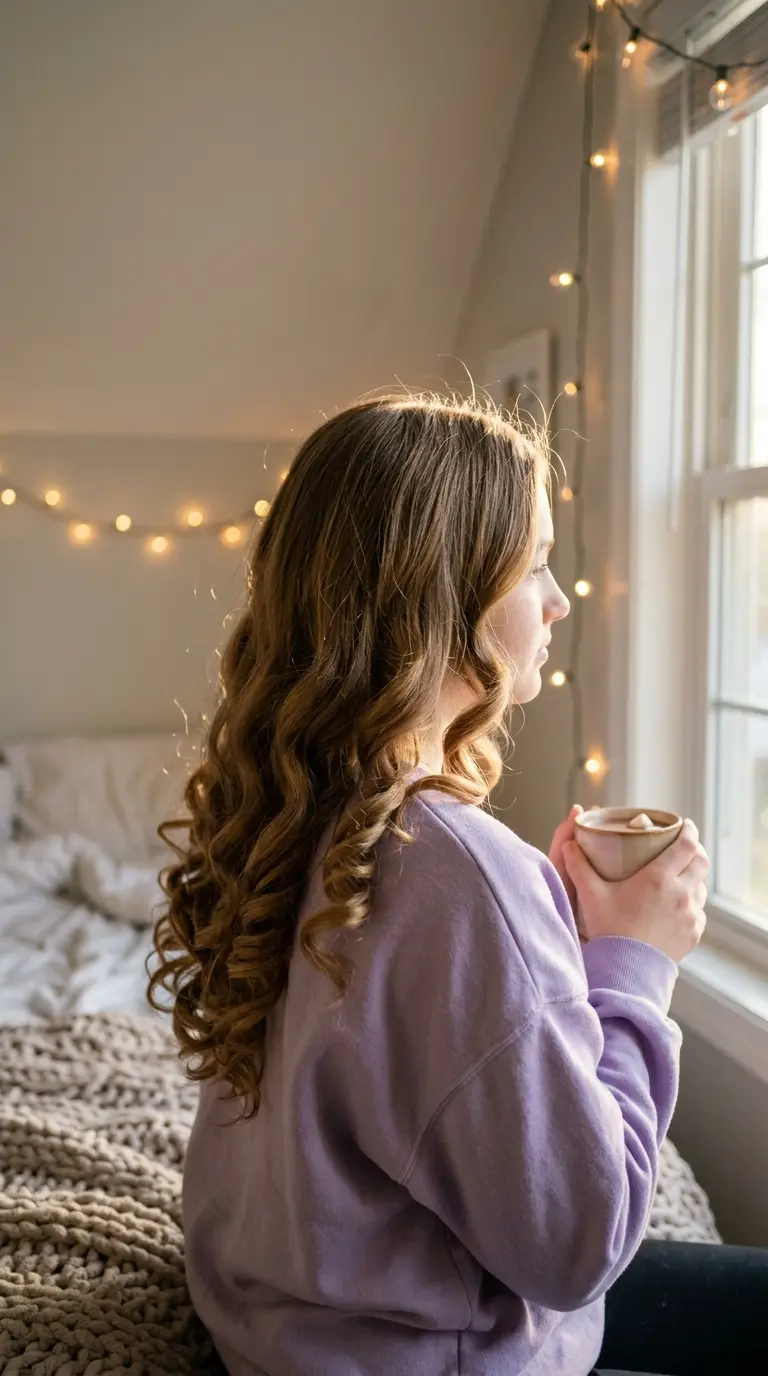
Bouncy blowout curls with no heat, no damage, and no early alarm. You wrap your hair around a sock before bed and wake up with the curls already done.
- Start with hair that is about 90 percent dry.
- Cut the toe off a long sock and roll it into a donut.
- Pull your hair into a high ponytail on top of your head.
- Place the ends of the ponytail over the sock donut.
- Roll the sock down toward your scalp, wrapping the hair around it.
- Pin it in place, sleep on it, and unroll gently in the morning.
Quick tip: separate the curls with your fingers, never a brush. A brush turns them into frizz in seconds.
Long hair washed at night and slept on loose. It is flat at the roots, kinked where it was pushed into the pillow, and straight at the ends.
The same hair rolled around a sock donut while still slightly damp. The roots lift, the curls start at the chin, and the ends bounce. No heat touched it.
8. Y2K Butterfly Clip Twists
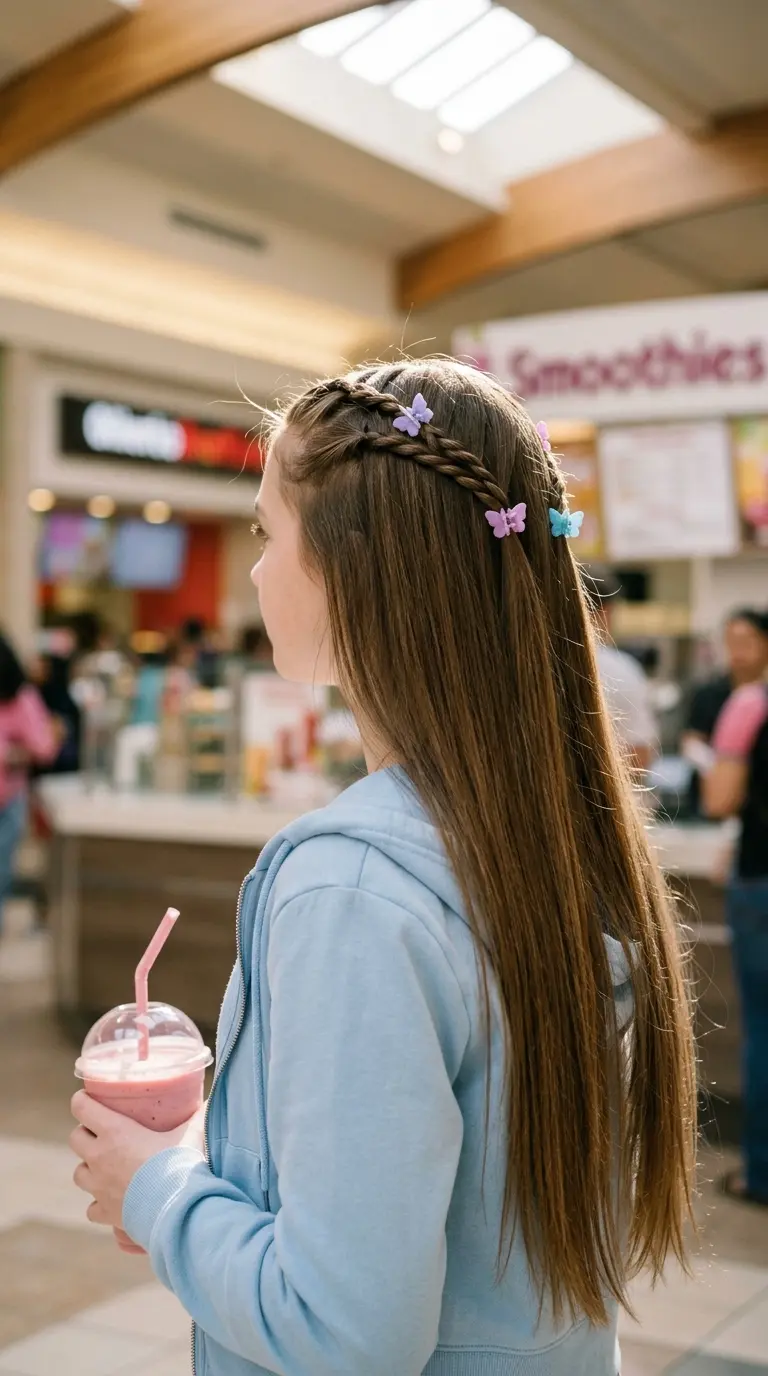
Butterfly clips are back and they look best on small twists at the front. This keeps hair off your face while showing off the clips.
- Make a center or side part.
- Take a one inch section right at the hairline.
- Twist it back toward the crown about three inches.
- Clip the end of the twist with a butterfly clip.
- Repeat with two or three more sections on each side.
- Space the clips evenly so they form a neat line.
Quick tip: twist every section away from your face. Twisting toward the face makes the twists unravel as soon as you let go.
9. Pancaked Dutch Braids
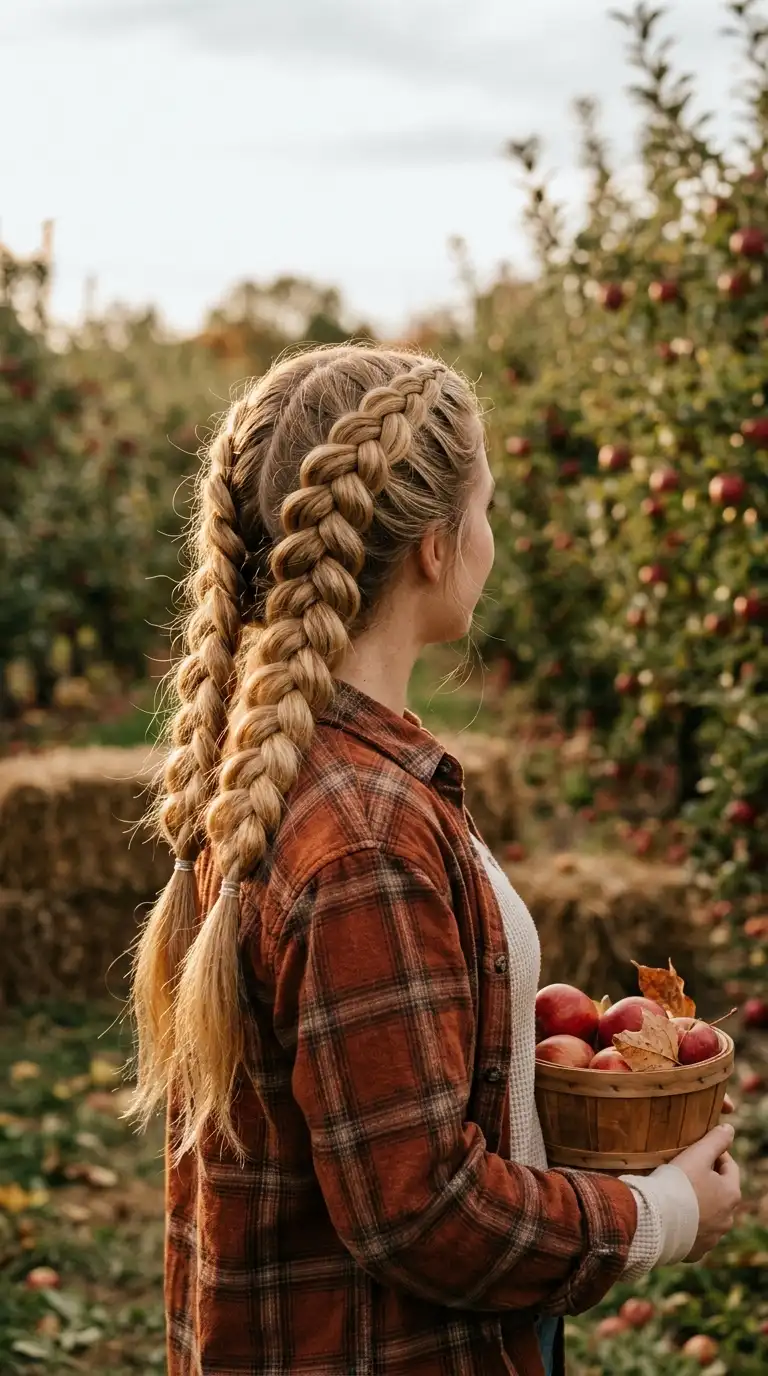
Dutch braids sit on top of the hair, and pulling the loops wide makes them look big and soft. This is the braid you see in every gym and game day pin.
- Part your hair down the center and clip one side away.
- Take three small strands at the front hairline.
- Cross each outer strand under the middle strand, adding hair each time.
- Braid to the nape, then finish as a regular three strand braid.
- Tie the end and repeat on the other side.
- Pull the outer edge of each loop outward, starting from the bottom.
Quick tip: pancake from the ends up toward the scalp. Starting at the top loosens the roots and the braid sags.
10. Half Up Messy Top Knot

The half up top knot keeps your face clear and still shows all your length. It is meant to look a little undone, so it is hard to get wrong.
- Gather the top third of your hair from the temples back.
- Tie it into a small ponytail on your crown.
- Twist the ponytail and wrap it loosely around the elastic.
- Secure the knot with a second elastic or two pins.
- Pull at the edges of the knot to make it bigger.
- Tug a few pieces loose around your face.
Quick tip: use dry shampoo on the top section first. Day old texture gives a messy knot the volume that clean hair cannot.
11. Milkmaid Braid Crown
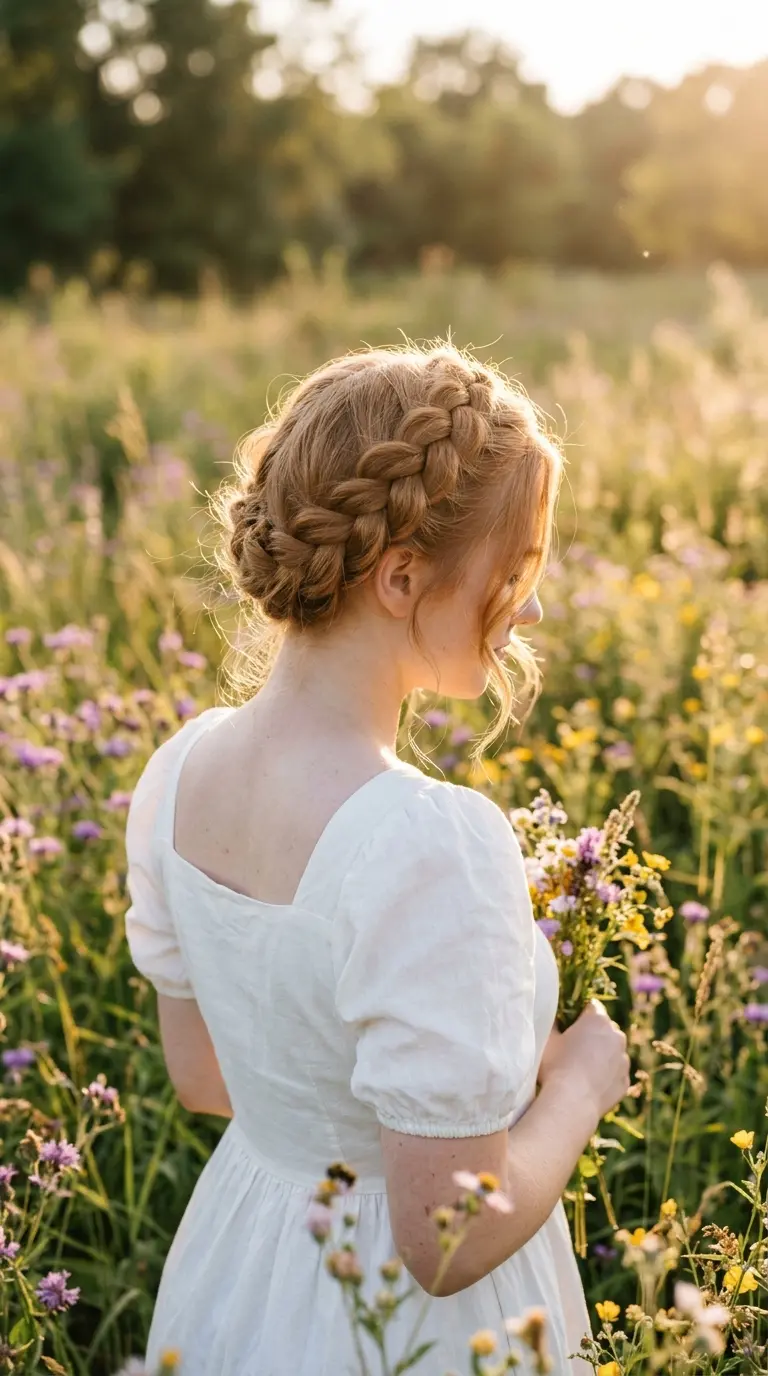
The milkmaid crown is the cottagecore classic. Long hair makes it easy, because the braids are long enough to cross all the way over the top.
- Part your hair down the center.
- Braid each side into a loose three strand braid and tie the ends.
- Pancake both braids by pulling the loops wider.
- Lift the left braid over the top of your head and pin it behind your right ear.
- Lift the right braid over and pin it behind your left ear.
- Tuck the ends under and add pins every two inches.
Quick tip: braid behind your ears, not at the nape. Starting low makes the braids too short to cross over the top.
Style on second day hair. Freshly washed hair is slippery, so clips slide and braids look thin.
Pull face framing pieces from in front of your ears, not behind them. Pieces from behind the ear hang too far back to frame anything.
Bend the loose pieces with a flat iron. Straight face framing strands look limp, while a soft bend looks intentional.
Loosen everything last. Do the style neat, then tug at the crown and the edges. Messy on purpose looks better than messy from the start.
12. Bandana Ponytail

A bandana adds color and covers a less than perfect hairline in one move. It gives a plain ponytail a retro, thrifted feel.
- Fold a square bandana into a triangle, then roll it into a long band about two inches wide.
- Brush your hair into a high ponytail and tie it.
- Lay the bandana across your head just behind the front hairline.
- Bring both ends under your hair to the nape.
- Tie a small knot and tuck the tails under.
- Shake the ponytail out or add a quick bend with a flat iron.
Quick tip: tie the bandana under your hair, not over it. A knot on top of the ponytail pulls it down and looks bulky.
13. Pull Through Braid Ponytail
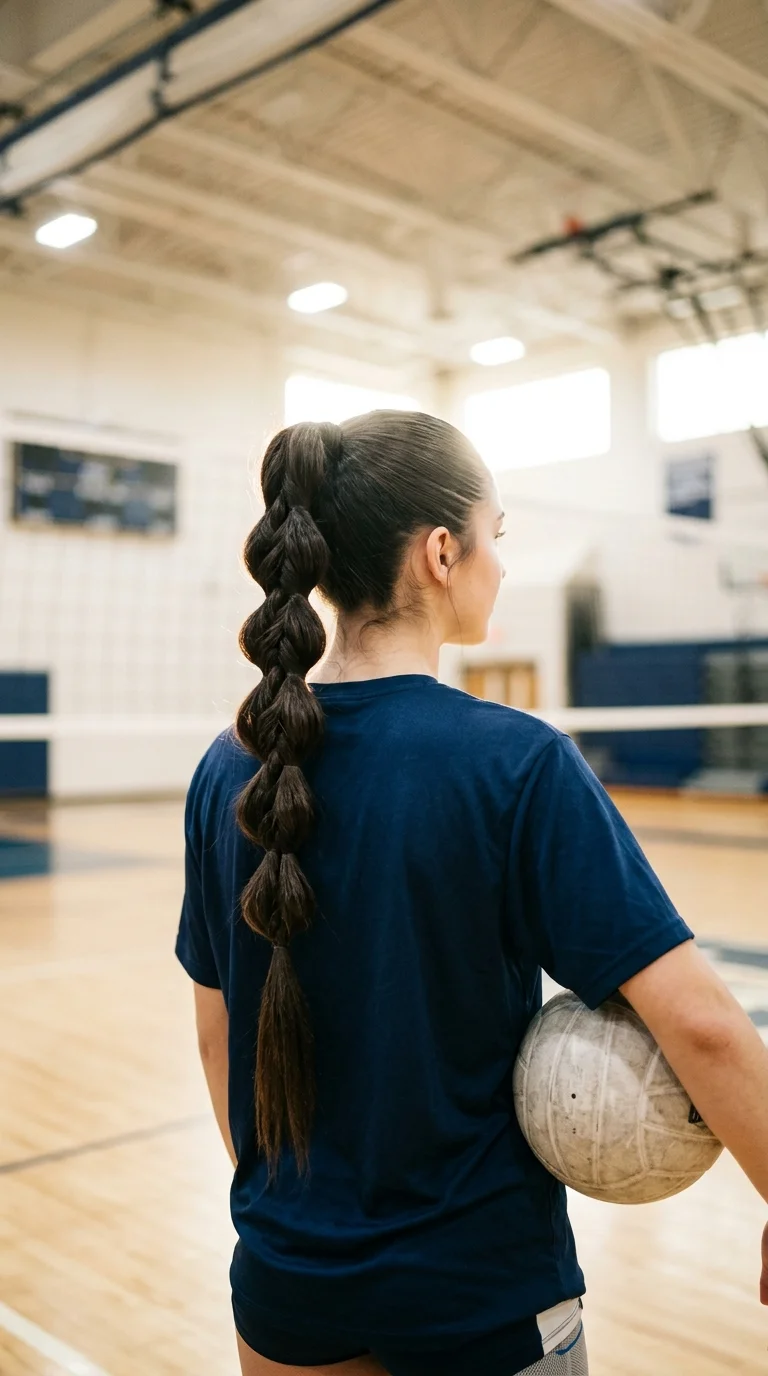
It looks like a complicated braid, but it uses only elastics. The loops stay put through practice and look full on any hair type.
- Tie a high ponytail.
- Split the ponytail into a top half and a bottom half.
- Tie the top half with an elastic two inches down.
- Split that section in two and pull the bottom half up through the middle.
- Tie the new top section two inches down and repeat.
- Pull each loop wider when you reach the ends.
Quick tip: always pass the same half through. If you switch halves, the loops twist and the pattern falls apart.
14. Balletcore Low Bun With Ribbon
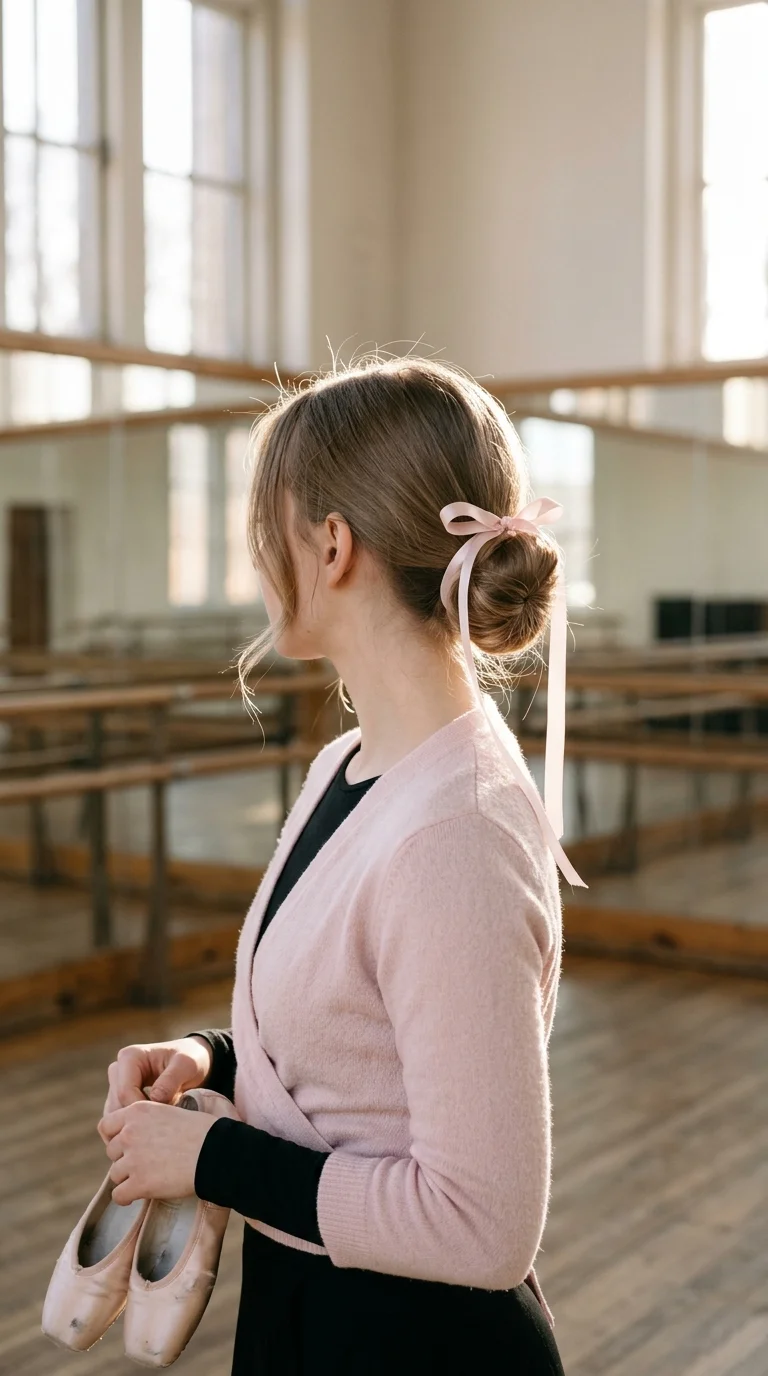
Balletcore took the classic dancer bun and made it softer. A ribbon wrapped around a loose low bun is the whole look.
- Leave two thin pieces out at the front.
- Gather the rest into a low ponytail at the nape.
- Twist the ponytail and coil it around the elastic.
- Pin the bun with three or four bobby pins.
- Wrap a satin ribbon around the base of the bun.
- Tie a small bow underneath and let the tails hang.
Quick tip: keep the bun low and loose, not tight like a real ballet bun. Soft is what makes it aesthetic instead of strict.
15. 90s Bouncy Blowout With Curtain Bangs
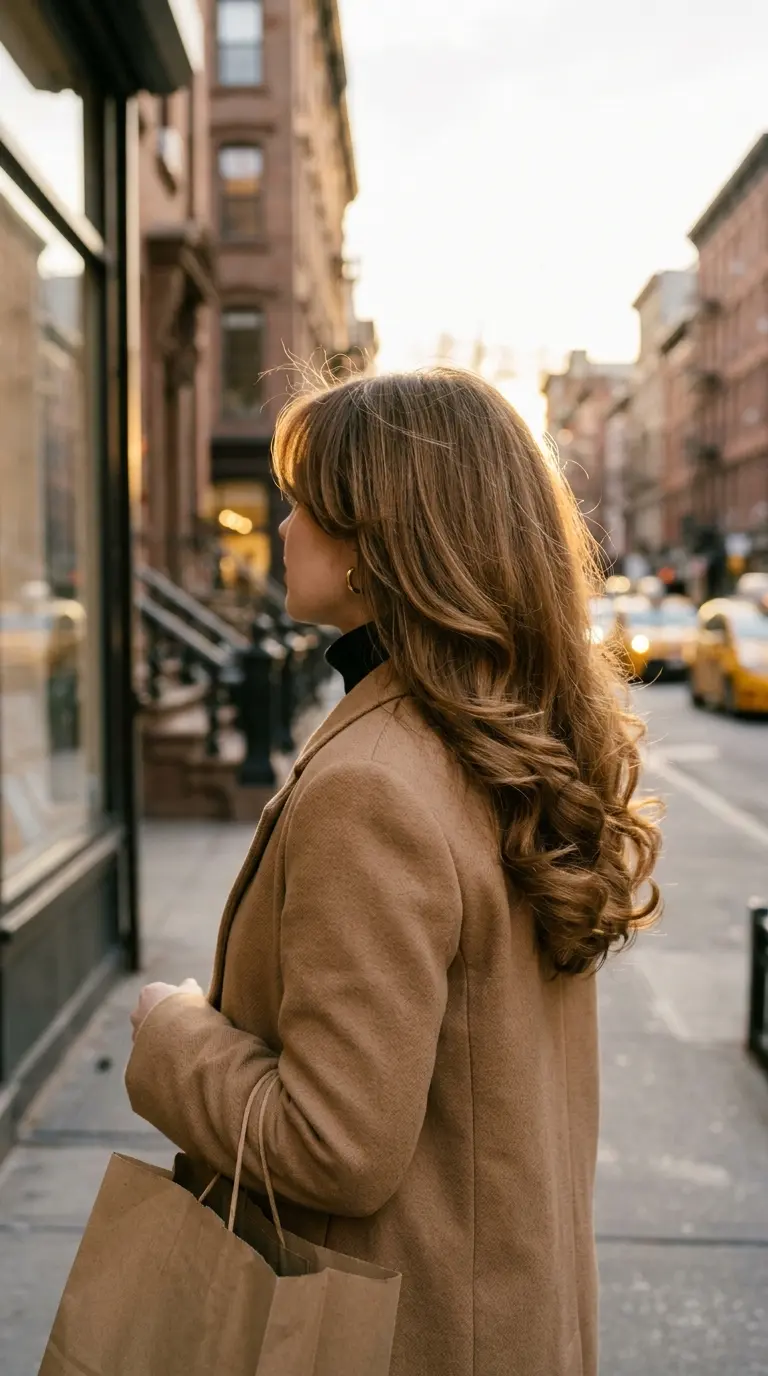
The 90s blowout is big, round, and bouncy, with curtain bangs that fall away from the face. On long hair it looks like a salon visit.
- Rough dry your hair until it is about 80 percent dry.
- Dry the curtain bangs first with a round brush, pulling them back and away from your face.
- Take two inch sections and roll each one around a large Velcro roller.
- Roll the sides away from your face and the back under.
- Hit the rollers with warm air and let them cool for 15 minutes.
- Take the rollers out and flip your head over to break up the curls.
Quick tip: let the rollers cool completely before you take them out. Warm curls drop flat within the hour.
16. Heart Half Up
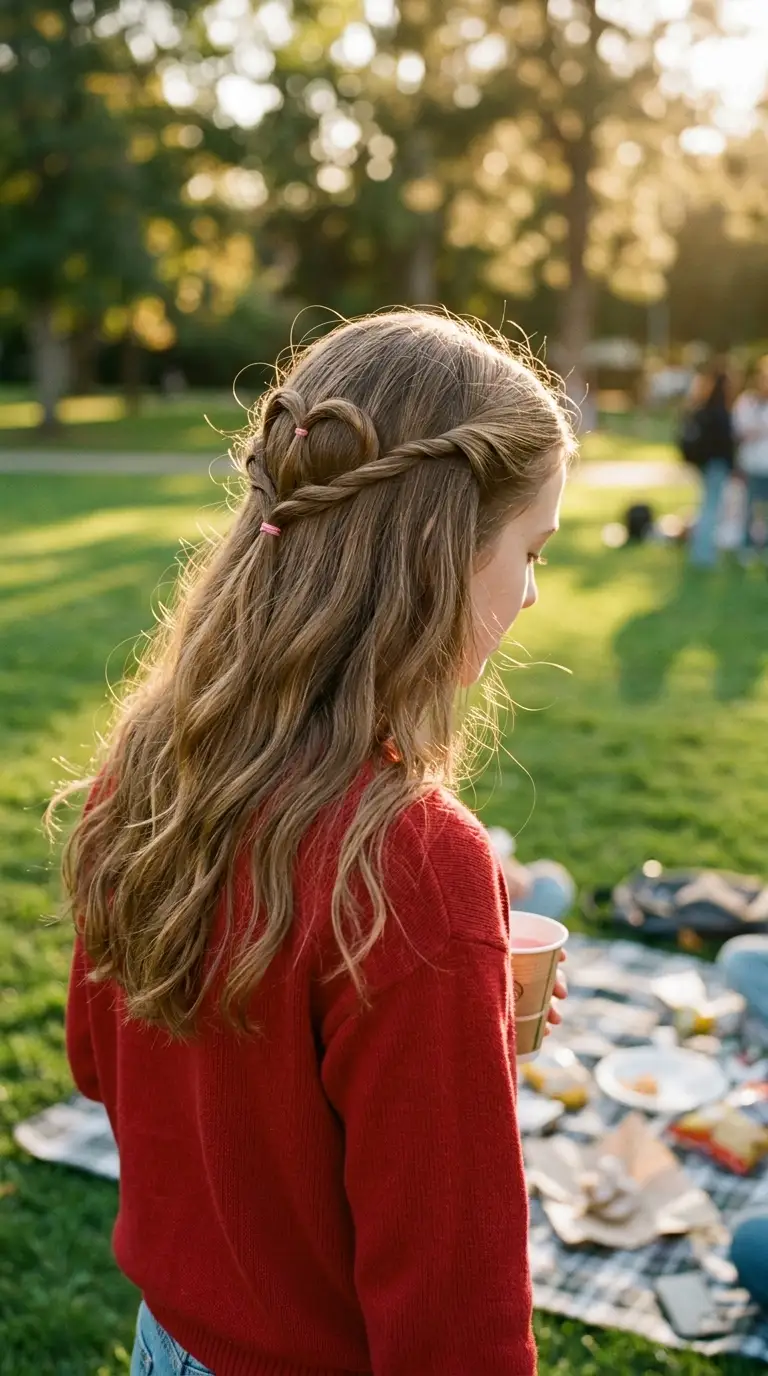
The heart half up is the cute style people stop you to ask about. It looks tricky, but it is two twists and a single elastic.
- Take a one inch section above each temple.
- Tie both sections together at the back of your head with a small elastic.
- Split the ponytail you just made into two halves.
- Pull each half down and around to the side, curving it upward.
- Bring both halves back to the center below the first elastic to form the bottom point of the heart.
- Tie them together with a second elastic and adjust the curves.
Quick tip: twist each side gently before you curve it. A twisted section holds its rounded shape, while a flat one collapses.
17. Sleek High Ponytail With Wrapped Base
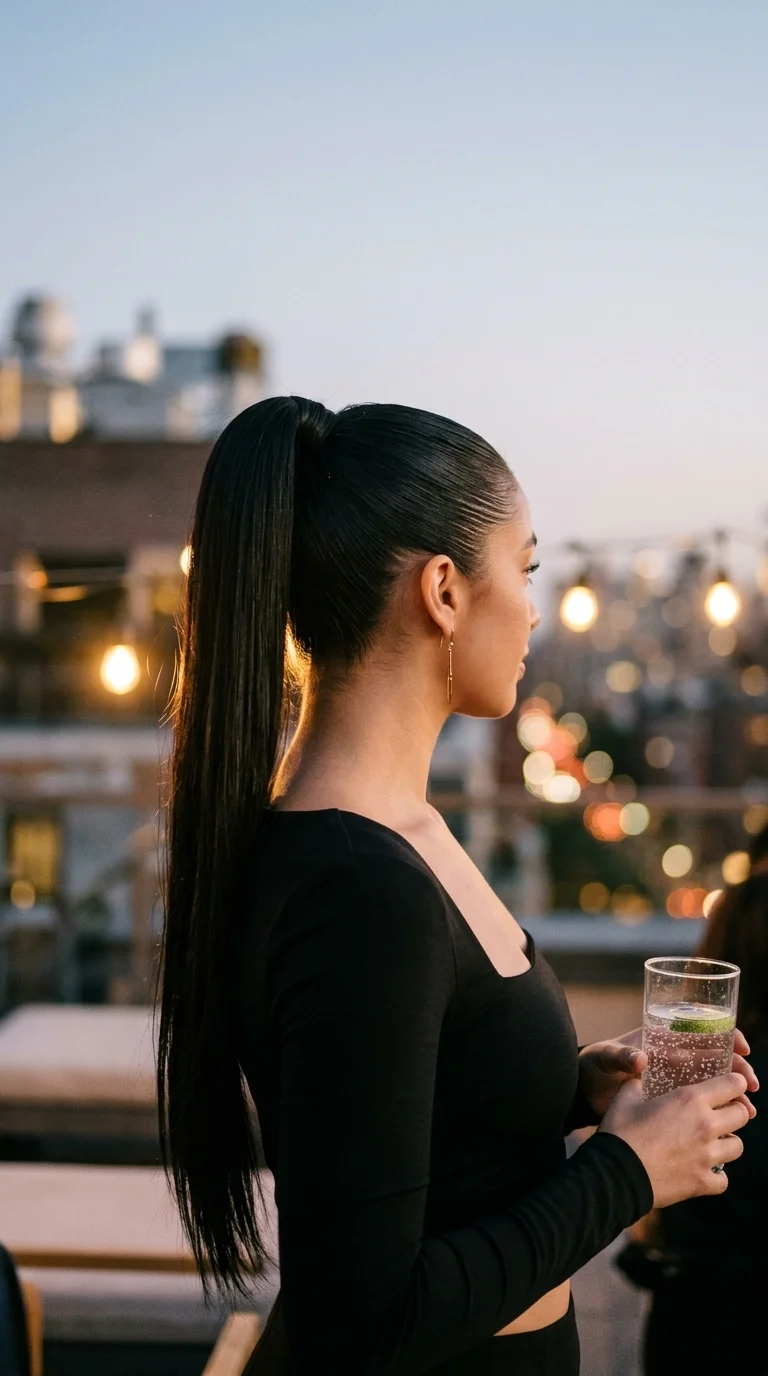
Sleek and snatched, the high ponytail is the dressed up version of everyday hair. A wrapped base makes it look finished.
- Smooth a little gel or cream over dry hair.
- Brush everything up to your crown with a boar bristle brush.
- Tie it tight with a strong elastic.
- Take a thin strand from the underside of the ponytail.
- Wrap it around the elastic until it is hidden.
- Pin the end under the ponytail and flat iron the lengths straight.
Quick tip: tilt your head back while you brush up. It stops the hair at the nape from sagging into a bump once you stand straight.
| Your Aesthetic | Styles to Try | What Makes It Work |
|---|---|---|
| Coquette | Bow half up, balletcore bun, heart half up | Ribbons, soft shapes, and pastel accessories |
| Clean girl | Sleek low bun, sleek high ponytail, pearl pin side part | Shine, sharp parts, and no flyaways |
| Y2K | Front braids, butterfly clip twists, crimped texture | Playful clips, skinny braids, and bold texture |
| Cottagecore | Milkmaid crown, waterfall braid, braided headband | Soft braids and romantic waves |
| Sporty | Bubble ponytail, pull through braid, Dutch braids | Styles that hold through practice and gym class |
| Effortless | Claw clip twist, messy top knot, sock curls | Loose shapes you can do in two minutes |
18. Waterfall Braid With Soft Waves
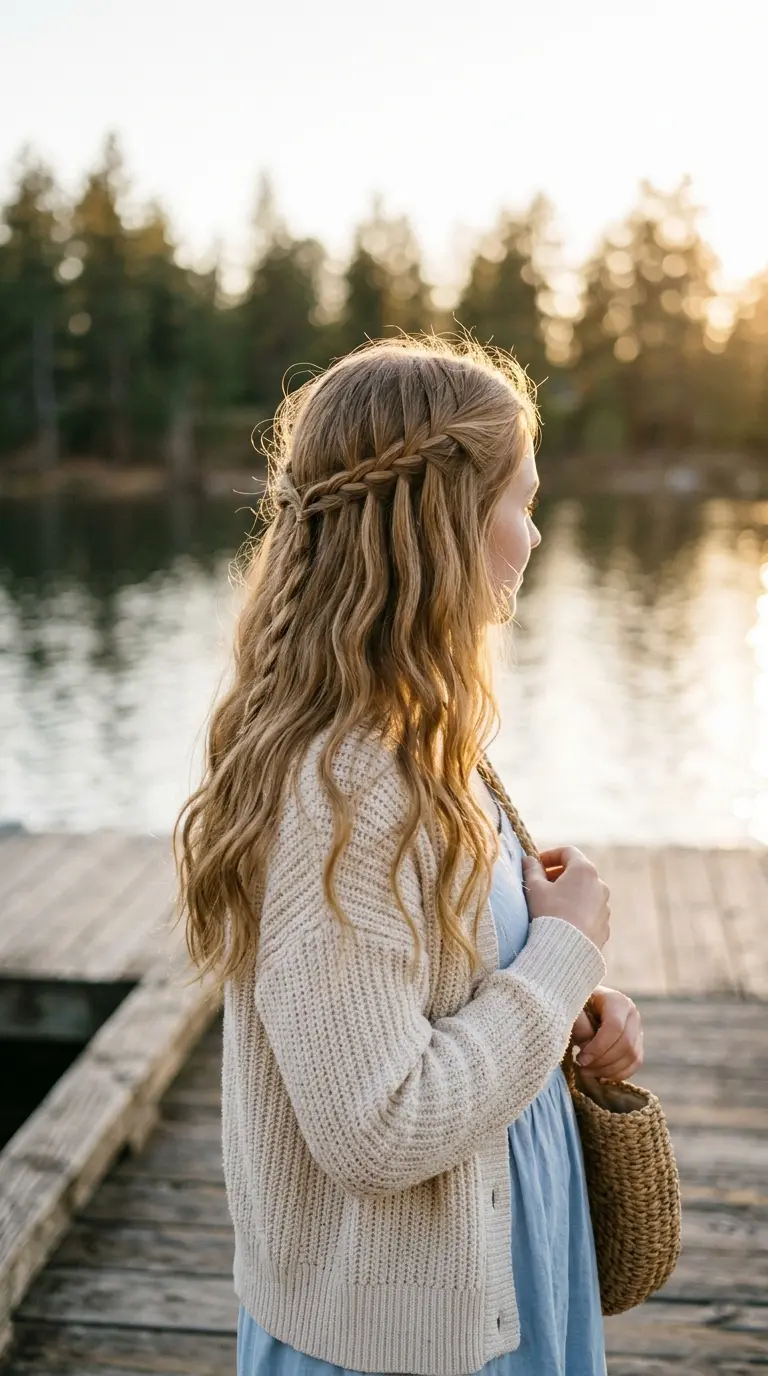
The waterfall braid looks delicate and romantic, with strands falling through the braid into the waves below. It works for dances, photos, and graduation.
- Curl or wave your hair first.
- Take three small strands at the front of your part.
- Cross the top strand over the middle, then the bottom strand over the middle.
- Drop the strand that is now on the bottom and let it hang.
- Pick up a new strand from just behind it and keep braiding.
- Continue across the back of your head and pin the end behind the opposite ear.
Quick tip: keep the braid level with the tops of your ears. A braid that angles down makes the falling strands look uneven.
19. Fishtail Side Braid
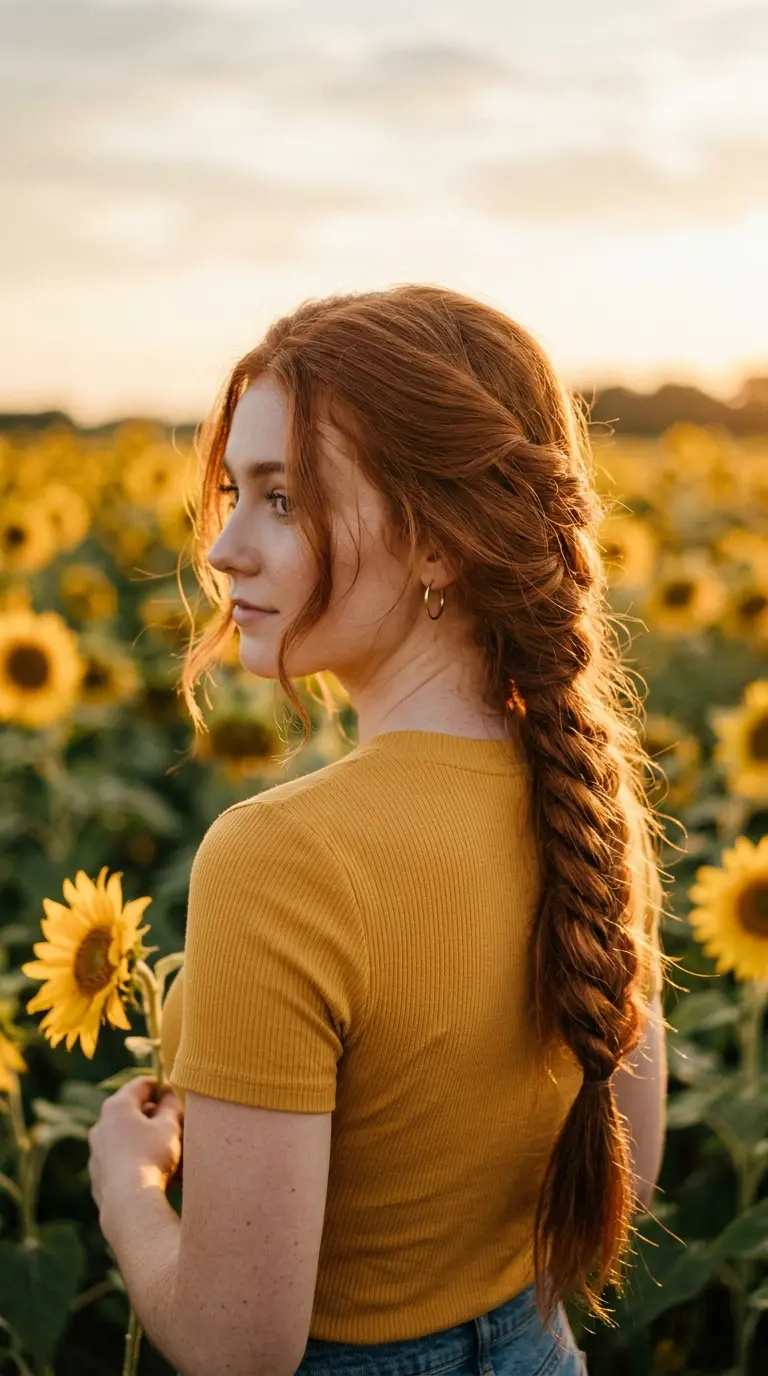
The fishtail has a fine woven pattern that looks detailed and effortless at the same time. Pulled over one shoulder, it shows off every inch of long hair.
- Sweep all your hair over one shoulder.
- Split it into two equal halves.
- Take a thin strand from the outside of the left half and cross it over to the right half.
- Take a thin strand from the outside of the right half and cross it to the left.
- Keep alternating until you reach the ends and tie with a clear elastic.
- Pull gently at the edges to loosen the weave.
Quick tip: use pencil thin strands. The thinner the strands, the more detailed and Pinterest worthy the pattern looks.
20. Low Rope Twist Pigtails
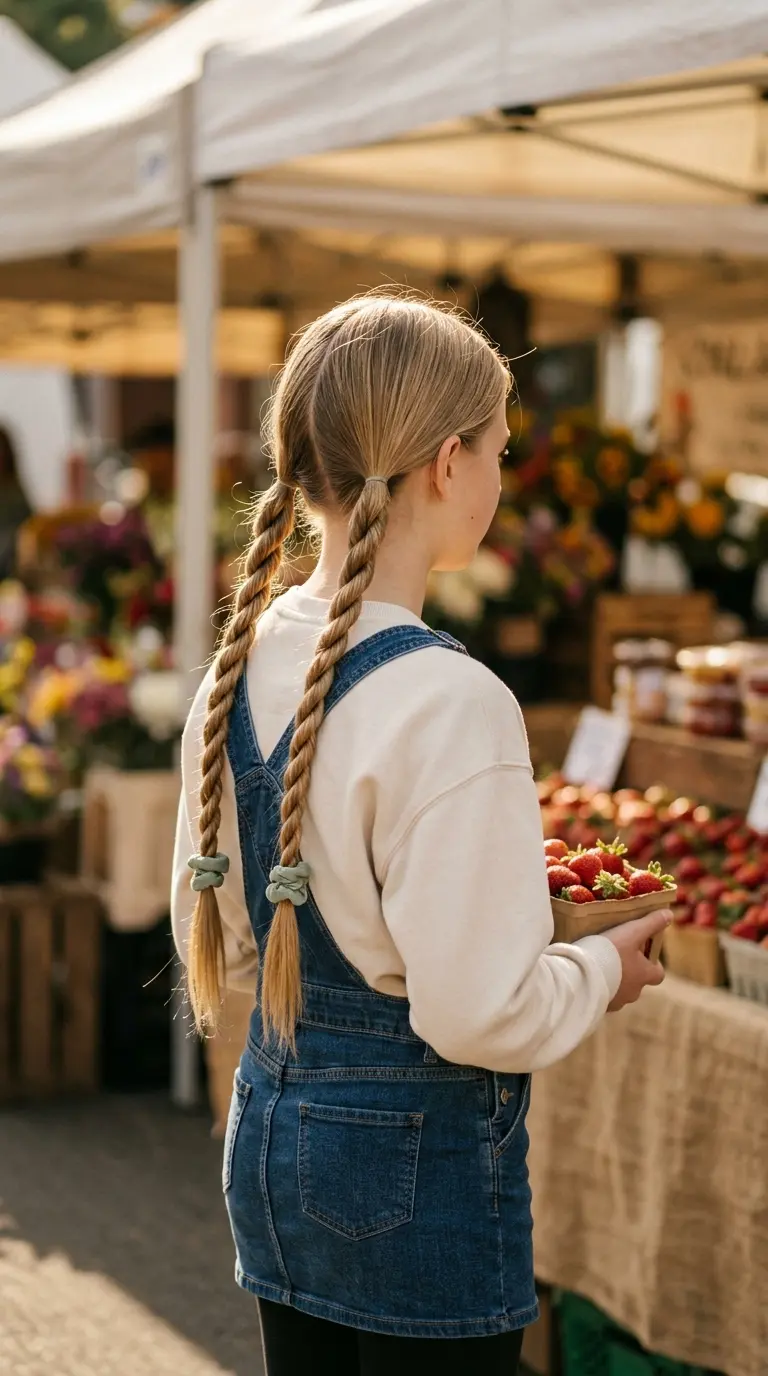
Rope twists are faster than braids and look just as neat. Low pigtails keep the look soft and a little nostalgic.
- Part your hair down the center.
- Tie each side into a low pigtail behind the ear.
- Split one pigtail into two strands.
- Twist each strand to the right.
- Cross the strands over each other to the left, all the way down.
- Tie the end with a scrunchie and repeat on the other side.
Quick tip: twist each strand one way and cross them the other way. That opposite tension is what keeps a rope twist from unwinding.
21. Crimped Mermaid Texture

Crimping is the Y2K revival that gives long hair huge volume. It turns flat hair into a full, textured mane in about fifteen minutes.
- Start with completely dry hair and use a heat protectant.
- Clip up the top half of your hair.
- Take one inch sections and clamp a crimper at the root for five seconds.
- Move down the section, lining up the crimper with the last crimp.
- Repeat on the bottom half, then the top.
- Run your fingers through gently and skip the brush.
Quick tip: line each new clamp up with the last zigzag. Gaps between clamps leave flat spots that break up the texture.
22. Pearl Pin Deep Side Part
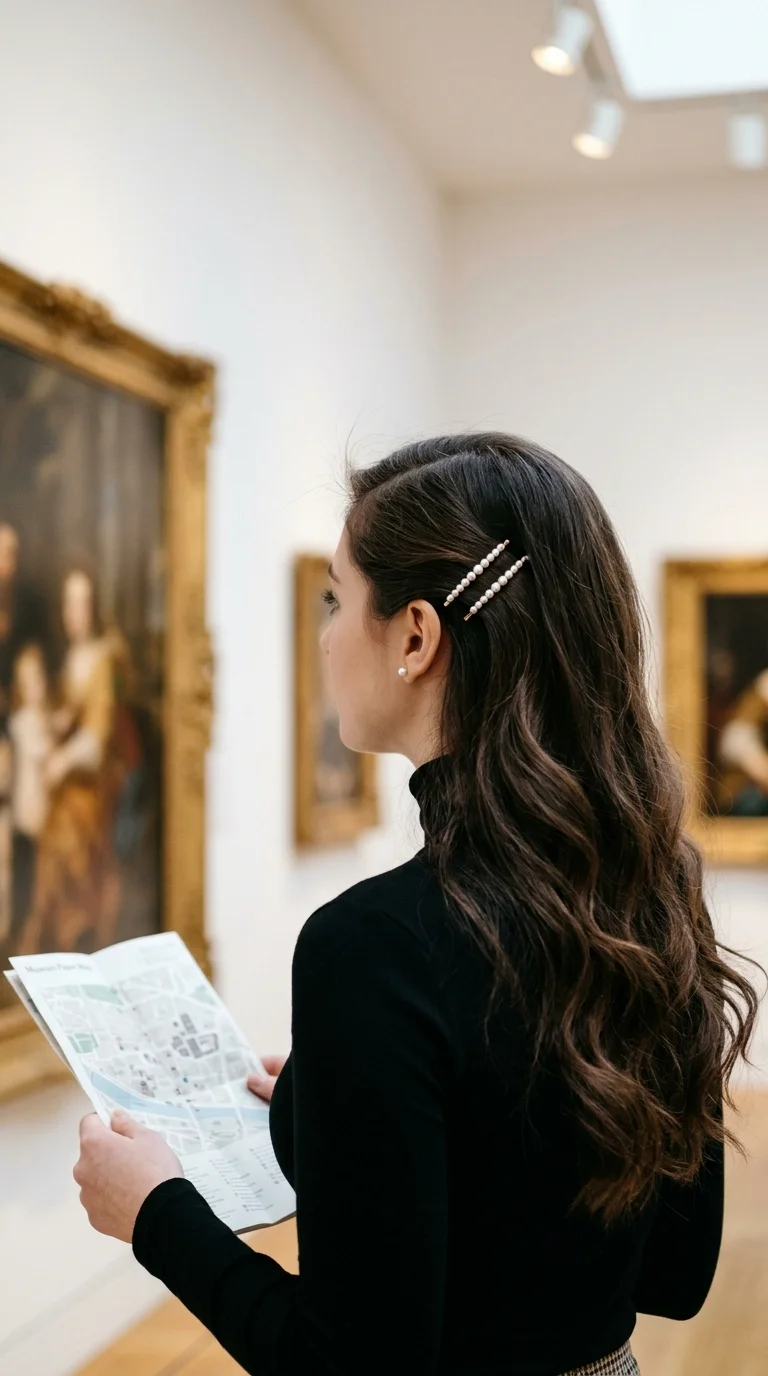
A row of pearl pins on the short side of a deep part looks expensive and takes one minute. It dresses up hair that is just down.
- Flip your part over to one side, about two inches from the center.
- Smooth the short side back over your ear.
- Slide the first pearl pin in just above your temple.
- Add four more in a neat diagonal line toward the back.
- Space them about half an inch apart.
- Let the heavy side fall forward over your shoulder.
Quick tip: slide each pin in at an angle with the wavy side down. The ridges grip the hair and stop the pins from sliding out.
23. Scarf Braided Ponytail
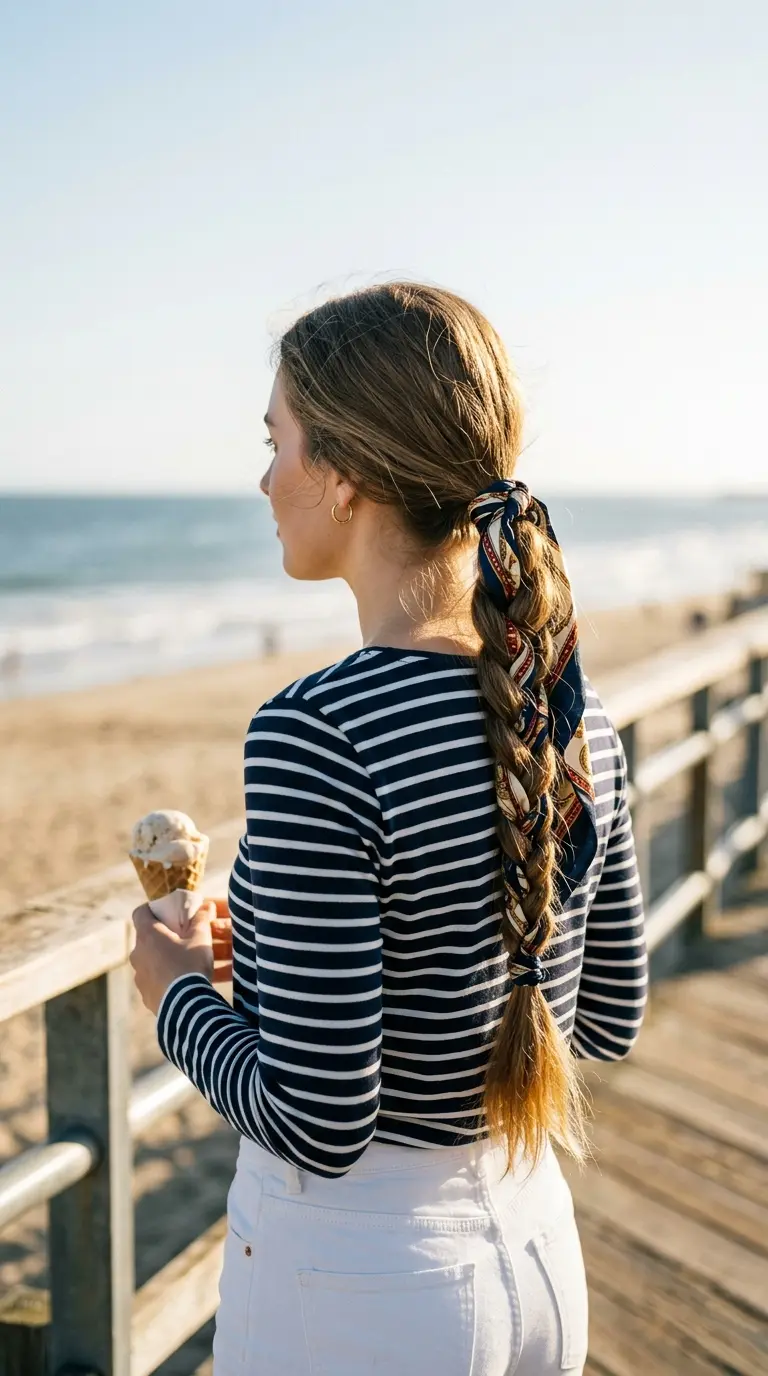
Weaving a silk scarf into a braid adds color all the way down your length. It is an easy way to match your hair to your outfit.
- Tie your hair into a mid height ponytail.
- Knot a thin silk scarf around the elastic so both ends hang evenly.
- Split the ponytail into three strands.
- Lay one scarf tail with the left strand and the other with the right strand.
- Braid down to the ends, keeping the scarf flat against the hair.
- Tie the end with the scarf tails and trim any extra.
Quick tip: choose a long, skinny scarf. A square scarf is too thick to braid in and makes the ponytail stiff.
24. Gold Hair Cuff Mini Braids
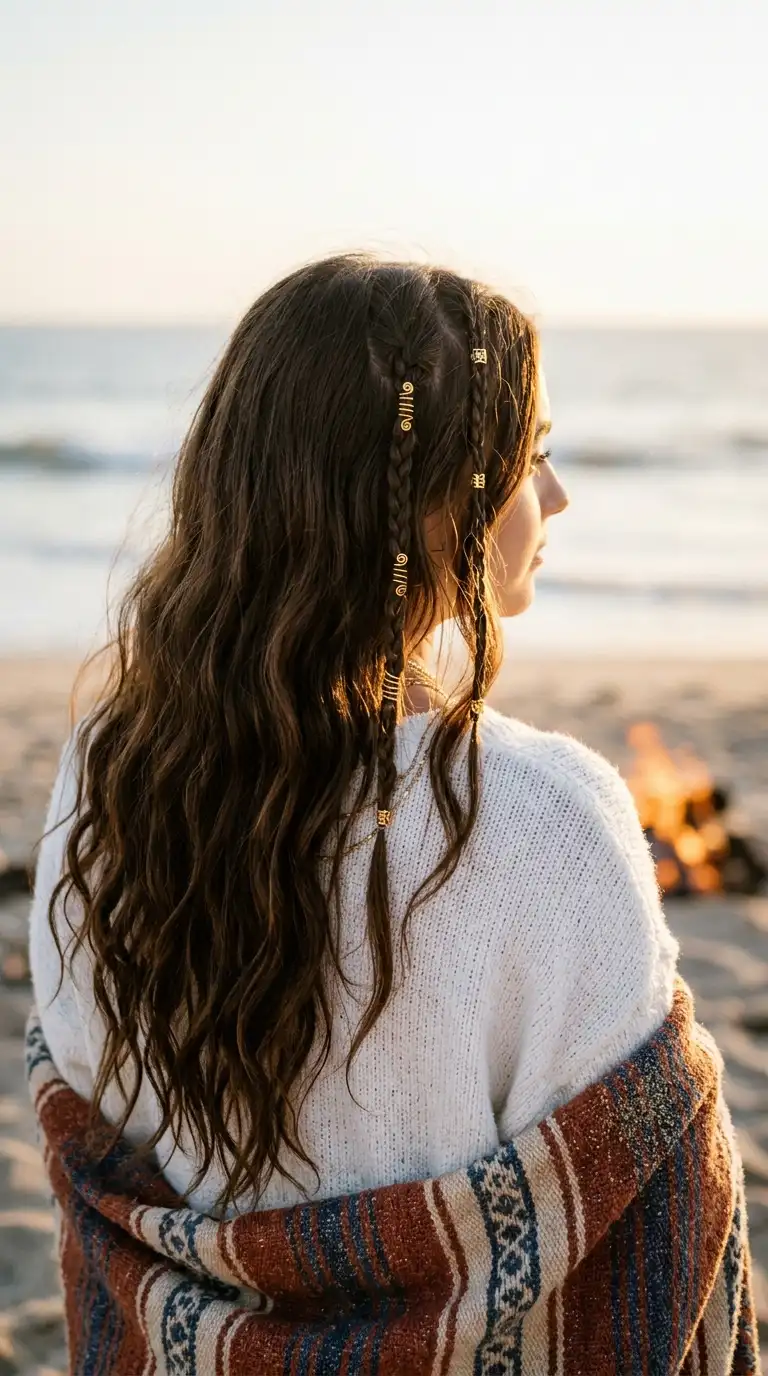
A few skinny braids tucked into loose waves with gold cuffs is the boho summer look. The cuffs catch the light every time you move.
- Wave your hair or leave your natural texture.
- Take three thin sections on one side, a few inches apart.
- Braid each one into a tight, skinny three strand braid.
- Tie the ends with tiny clear elastics.
- Clip two or three gold cuffs along each braid.
- Let the braids fall in with the rest of your hair.
Quick tip: braid sections no wider than a pencil. Thin braids show off the cuffs, while thicker ones hide them.
25. Braided Headband With Loose Waves
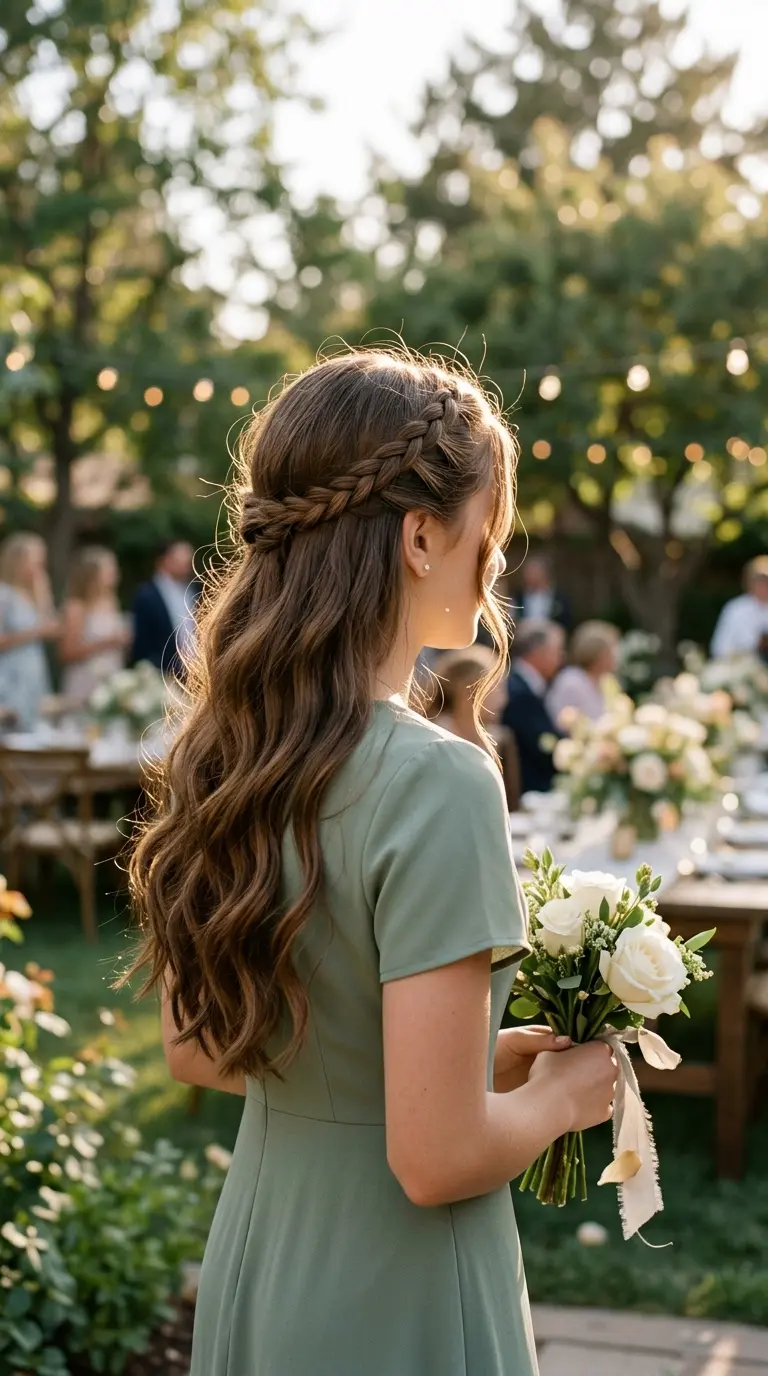
A braid laid across the top of the head works like a headband that never slides. It is a soft, pretty finish for any event where your hair stays down.
- Take a two inch section behind your left ear.
- Braid it into a three strand braid all the way to the ends.
- Pancake the braid so it lies wider.
- Lay it over the top of your head, about two inches behind your hairline.
- Pin the end behind your right ear, hidden under your hair.
- Wave the rest of your hair loosely.
Quick tip: pin the braid behind the opposite ear, not on top of it. Pins hidden under the hair hold better and stay invisible.
Pinterest hair is neat underneath and soft on top. Lock the base with an elastic, a pin, or a tight twist, then loosen the edges and pull out a few face framing pieces. Every style on this list follows that same rule.
Your Next Pinterest Hair Day
Long hair gives you more options than any other length. You can wear it sleek, soft, braided, clipped, curled, or tied with a bow, and every look on this list is doable in your own bedroom mirror.
Start with the messy claw clip twist and the heatless sock curls. Once those feel easy, try the pull through braid and the heart half up. Every one of these aesthetic hairstyles for long hair builds on the same few moves, so each style gets faster after the first try.
Take a photo from the side and the back each time you try a new one. That is the angle Pinterest shows, and it is the best way to see what to fix next time.
Save this list to your hair inspo board so it is ready the next time you need a new look.