
Most haircuts for thin fine hair go wrong for the same reason. They try to take hair away. Thinning shears, long razored layers, wispy tapered ends. That approach works on thick hair. On yours, it leaves the ends see through and the crown flat by lunchtime.
Fine strands are narrow, and thin hair means fewer of them. Put the two together and every layer and every snip at the ends shows. The good news is that the right cut does a lot of what a volumizing spray promises and rarely delivers.
The 27 cuts below follow a few simple ideas. Keep weight at the hemline. Put lift where hair goes flat first, which is usually the crown. Use bangs and face framing to pull the eye forward. Some cuts are short and sharp, some stay long, and a few are made for fine waves and curls.
Screenshot the one that fits your hair and bring it to your next appointment. A clear photo beats a vague description every time, especially when your stylist is used to cutting thicker hair.
1. Blunt Shoulder Cut With an Unthinned Hem

Thin hair looks thinnest right at the ends. That is where a lot of cuts go wrong.
Many stylists reach for thinning shears or slide cutting to add movement. On fine hair, that removes the little density you have at the bottom, and the hem turns see through when light hits it from behind.
Ask for this instead:
- One length, cut straight across at the shoulders
- No thinning shears and no texturizing razor
- A quick dry check so the line sits level when your hair falls naturally
Quick tip: if your ends flip out where they touch your shoulders, go an inch above or below that line so the hem hangs straight.
2. Cloud Bob With Ends Beveled Under

Look at the bottom of a cloud bob and you will see the ends curling softly under, almost like the hair is hugging itself. That curve is cut in, not just blown in.
Your stylist angles the scissors so the underneath hair sits a touch shorter than the top. On fine hair this builds a rounded, puffy shape that holds up even when it air dries.
How to style it fast:
- Rough dry until it is mostly dry.
- Wrap the ends around a medium round brush and blast them for a few seconds.
- Finish with a pea sized dab of light cream on the ends only.
Best for chin to jaw length hair.
3. Micro Bob Cut at the Earlobe

Short hair has less weight pulling it flat. That is the whole secret of the micro bob.
Cut right at the earlobe, the hair sits close to the face and the ends look solid because every strand is the same short length. Fine hair that looked limp at the collarbone suddenly has a shape.
It does ask for regular trims. Once it grows past the jaw, the crisp line goes soft and it starts to look like an in between phase.
Good match for: oval or heart shaped faces, fast mornings, and anyone who wears a lot of earrings.
4. Modern Pageboy With a Rounded Fringe

A regular bob with bangs has two separate parts. A pageboy blends them into one rounded shape that wraps from the fringe, around the sides, and down to the back.
That continuous curve is what helps thin hair. There is no gap where the scalp peeks through at the temples, because the sides are cut to meet the fringe.
What to say at the salon:
- A rounded fringe that sits right at the brows
- Sides that curve down to the jaw
- A back cut at the nape and beveled slightly under
It reads a little retro and a little French. Book quick fringe trims between appointments so it never sits in your eyes.
5. Chin Length Micro Shag

The usual mistake with shags on fine hair is cutting layers all the way down. You end up with stringy ends and a fluffy top that look like two different haircuts.
A micro shag keeps it short and controlled. The layers stay around the crown and the face, and the outline at the chin stays fairly full.
What you get:
- Lift at the crown without teasing
- Piecey bits around the cheekbones
- A shape that looks better slightly messy
Scrunch a little sea salt spray into damp hair and let it dry on its own. This cut honestly looks best on day two.
6. Pixie With a Full Blunt Fringe

Bring a photo and ask for three things: a short tapered back, longer pieces on top, and a thick blunt fringe cut from farther back on the head.
That last part matters most. When the fringe starts behind the hairline, it borrows hair from the top and looks much denser across the forehead.
Daily routine:
- Blow dry the fringe flat with a paddle brush, side to side.
- Rub a tiny bit of paste between your fingertips.
- Pinch the top pieces so they separate.
Small warning: a blunt fringe on a strong cowlick will fight you every morning. Ask your stylist to check how your front hairline grows before cutting.
7. Choppy Crop With Piece Cut Edges
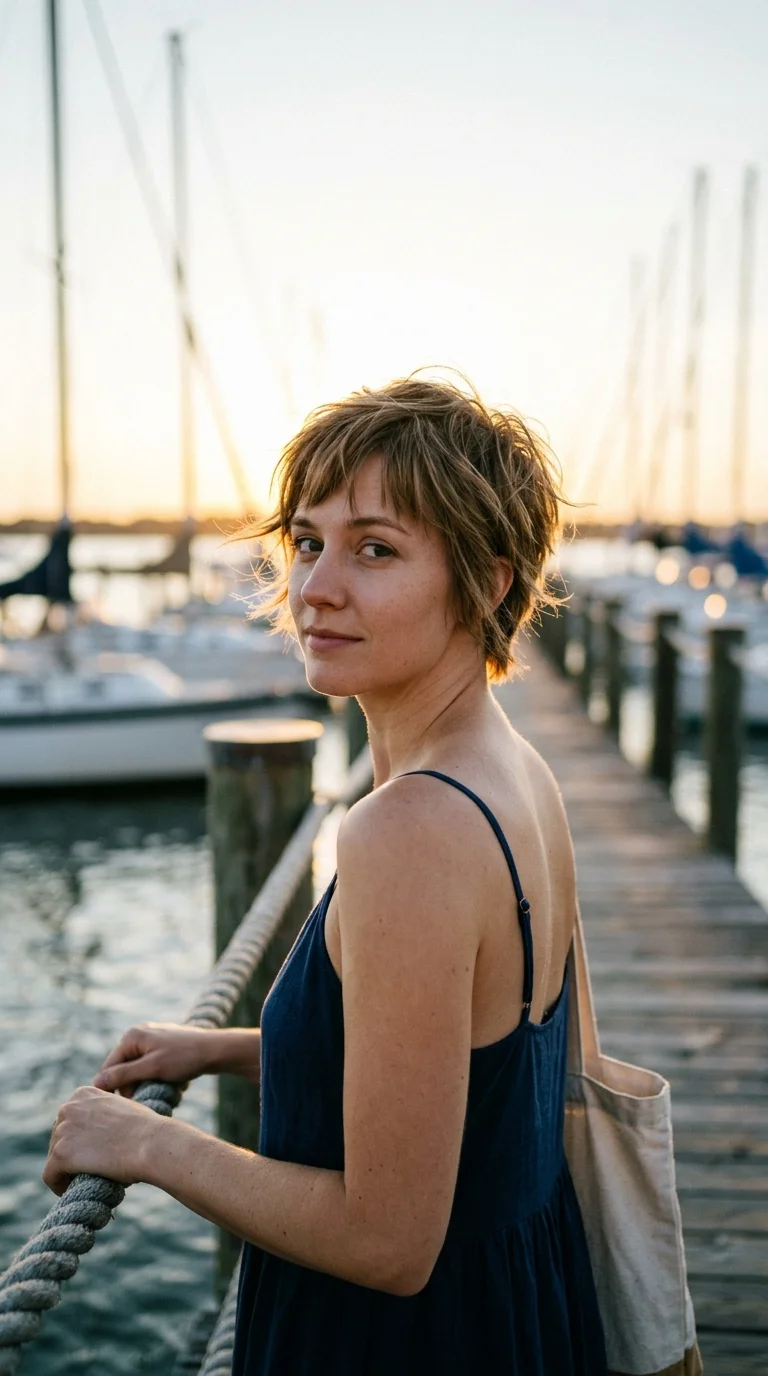
Fine hair that is cut too neatly can look a bit flat, almost painted on. A choppy crop fixes that.
The stylist point cuts the edges, snipping into the ends at an angle instead of straight across. That leaves tiny uneven pieces that catch the light and make the hair look like there is more of it.
It is the haircut for people who never touch a blow dryer. Towel dry, push it around with your fingers, and head out.
Quick tip: ask for the point cutting to stay shallow. Deep snips into fine ends can leave them wispy instead of textured.
8. Pixie With a Long Crown and Tight Nape

Here is a simple rule for short cuts on thin hair: keep the length where you need the lift.
The crown is where fine hair goes flat first, so this pixie leaves a few inches up there and cuts the nape and sides close. The contrast makes the top look fuller than it is.
- Nape: short and cleaned up every few weeks
- Sides: tucked neatly above the ears
- Crown: long enough to push up and back
Blow dry the crown forward first, then flip it back while it is still warm. That one switch gives more height than any spray.
9. Bob With Baby Bangs

Short, straight baby bangs sitting halfway up the forehead pull the eye right to the front. Nobody is looking at how much hair you have in the back.
Paired with a jaw length bob, the look is bold but easy to wear. Fine hair actually works well here because a short fringe stays put instead of splitting into gaps.
Two things to know before you cut:
- Baby bangs need a trim every two to three weeks to stay sharp.
- Ask for a slightly textured edge rather than a ruler straight line for a softer finish.
Best on oval and longer face shapes.
10. Center Part Bob Cut a Touch Shorter in Back

A center part can look severe on thin hair. The hair splits straight down the middle, and both sides lie flat against the cheeks.
Cutting the back about half an inch shorter than the front changes that. The slight angle tips the hair forward and lets it swing toward the face, so the sides look fuller.
It is subtle. Most people will not spot the angle, only that your bob looks more lively.
Keep it polished:
- Flat iron the ends with a slight bend inward
- Dust dry shampoo along the part on day two
- Tuck one side behind your ear for a quick change
11. Ear Grazing Bob With a Side Swept Fringe

Rainy mornings, a quick hat, a ponytail that will not hold. Short fine hair that sits right at the ears handles all of it.
The cut lands where the ear tips meet the jaw, and the fringe is cut long and angled so it sweeps across the forehead to one side. That diagonal line breaks up the front and hides a thin spot at the part.
Styling notes:
- Blow dry the fringe in the opposite direction first.
- Flip it back to its natural side while still warm.
- Let it cool before you touch it.
That warm and cool trick gives the sweep real lift at the root.
12. Feathered Shoulder Cut With Flicks Away From the Face

Most face framing pieces curl in toward the cheeks. Feathered pieces do the opposite. They flick back and away, like a soft wing.
On fine hair, that outward flick creates width at the sides of the face, which reads as more hair overall.
Your stylist cuts the front pieces at an angle starting around the cheekbone and blends them into a shoulder length back.
How to set it:
- Round brush the front pieces up and back
- Hit each one with cool air for a few seconds
- Mist a light hold hairspray, not a stiff one
Best for straight to slightly wavy hair.
13. Soft Mini Wolf Cut With Heavy Lengths

Wolf cuts look like they need a lot of hair. They do not, as long as the stylist adjusts the recipe.
The full version has heavy layers all over, which fine hair cannot afford. The soft mini version keeps short choppy layers only at the crown and around the face, and leaves the lengths near the shoulders mostly intact.
- Crown: short and piecey for lift
- Face: curtain style pieces
- Lengths: kept thick, only lightly point cut
Watch out: if your ends are already sparse, ask for the mini wolf on a shorter base around the collarbone, so the bottom still has weight.
14. Lob With Face Framing That Starts at the Chin

Where the face framing begins makes a big difference on thin hair.
Start it too high, at the cheekbones or eyes, and the front pieces get so short that the lengths below look sparse. Start it at the chin, and the front gets shape while the lob keeps most of its weight.
It also grows out kindly. After a few months the pieces simply blend into the length.
Quick tip: tuck the framing pieces behind your ear on one side and leave the other side loose. The uneven look adds movement without extra styling.
Face framing that begins at chin level, not the eyes.
A back that stays one length to the collarbone.
A small round brush to bend the front pieces away from your face.
Layers starting at eye level on fine hair.
Thinning out the front pieces to make them lighter.
Heavy serum on the framing, which makes it separate.
15. U Shaped Hem on Mid Back Hair

Long thin hair often gets a V shaped hem that tapers to a point in the middle of the back. That point looks wispy fast.
A U shape is gentler. The hem curves softly, so the sides are only a little shorter than the center and more hair stays along the bottom edge.
Compare the three:
- V hem: dramatic, but the tip can look see through
- U hem: rounded and fuller looking
- Straight hem: the most density, but less movement
The U lands in a sweet middle spot. It still sways when you walk, and the ends look healthy instead of scraggly.
16. Long One Length Cut Trimmed to Bra Strap Level

Waist length hair on fine strands often looks thinner than it is, simply because the ends have had years to wear down.
Trimming up to bra strap level takes off the oldest, most split part and keeps the bottom one solid length. Losing only a few inches can make long hair look noticeably fuller.
Keep it in shape:
- Book a light dusting every eight to ten weeks.
- Sleep in a loose braid to protect the ends.
- Detangle from the bottom up when it is wet.
Still long enough for braids and buns, minus the stringy tail.
17. Long Hair With Wispy Birkin Bangs

Birkin bangs make long fine hair look intentional. They add interest at the front so the eye stops there, and the long lengths fade into the background.
These bangs are wispy and a bit uneven, sitting just above the lashes. Because they are not thick, they do not steal much hair from the top, which matters when you do not have much to spare.
- Let them air dry, then flatten them with your fingers
- Split them slightly in the middle on humid days
- At home, trim only the very tips, never straight across
They look best a little messy. Too neat, and they lose their charm.
18. Fine Curly Lob Cut Dry Curl by Curl

Fine curls shrink and separate easily, so a wet cut can surprise you once everything dries. Cutting dry removes the guesswork.
The stylist cuts each curl where it naturally sits, shaping a lob that is rounded at the bottom with a bit of lift near the crown. Fine curls need fewer layers than thick curls, so ask for a light hand.
Wash day routine:
- Smooth a lightweight curl cream into soaking wet hair.
- Scrunch out the water with a cotton T shirt.
- Diffuse on low until mostly dry, then leave it alone.
Heavy butters weigh fine curls down. Light foams and gels hold better.
19. Wavy Collarbone Cut With Round Crown Layers
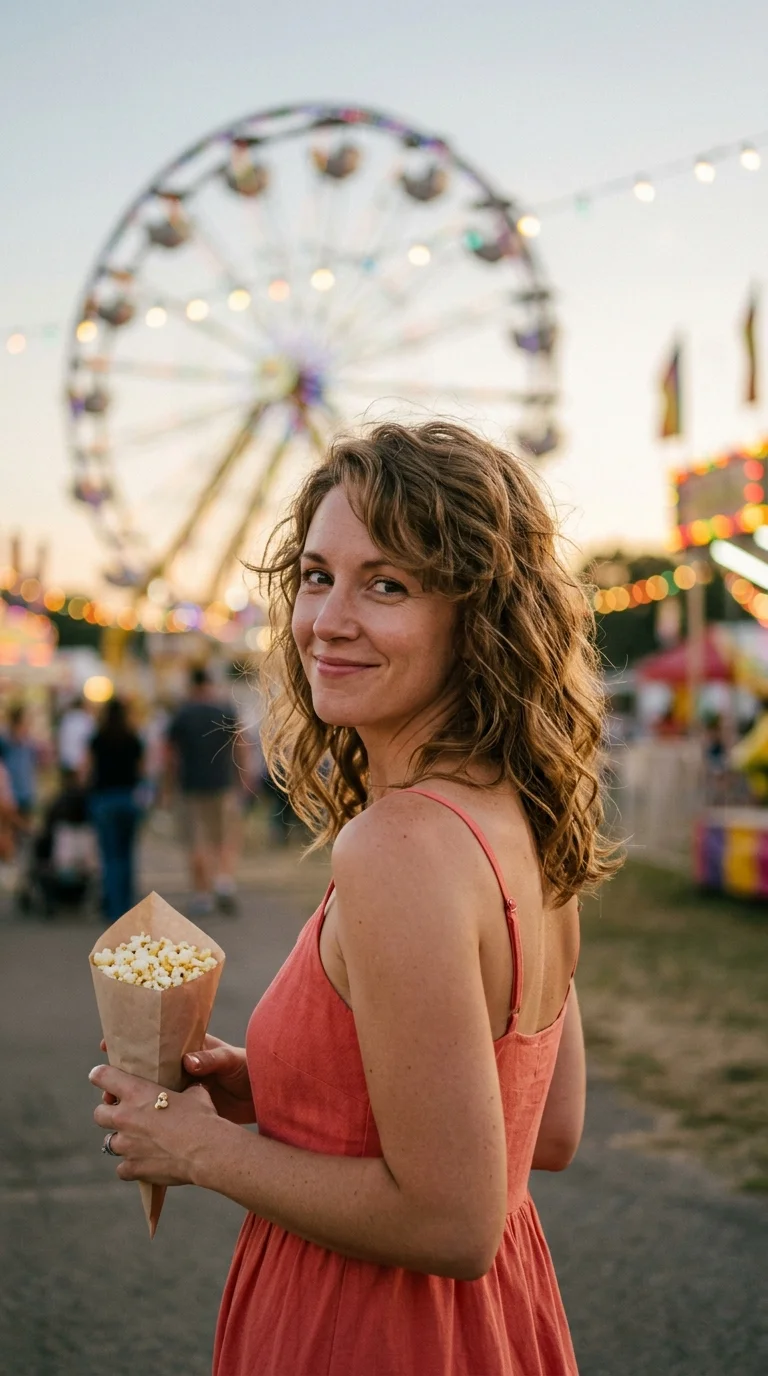
Short, round layers at the crown give fine waves something to stack on. The waves underneath stay at full length, so the bottom does not look thin.
The layers are cut only above the ears in a halo shape. On a wavy collarbone cut, they bounce up and create a rounder outline at the top of the head.
Quick tip: wrap wet hair in a microfiber towel for ten minutes before diffusing. It keeps the crown layers from being pulled flat by their own weight while drying.
Works best on 2A to 2B waves. Straight hair needs a round brush to get the same lift.
20. Shoulder Length Cut With Arched Bardot Bangs

Bardot bangs are longer at the sides and shorter in the middle, forming a soft arch that frames the eyes.
On a shoulder length cut, that arch connects the fringe to the rest of the hair. The connection matters for thin hair, since there is no hard line where the bangs stop and the sides begin.
Before you book:
- Bring a photo of the exact arch you like
- Ask for the center at the brows and the sides at the cheekbones
- Plan for a fringe trim every four weeks or so
Blow dry them over a round brush, center section first.
21. Swing Bob Cut to Move When You Walk

Blunt bobs sometimes just sit there. On thin hair, a still bob can start to look like a helmet by the afternoon.
A swing bob adds soft internal layering underneath, so the outer layer stays full while the inside has room to move. Turn your head and the whole bob sways, then settles back.
Ask for:
- A jaw to chin length base
- Internal layers only, nothing visible on top
- Ends that are slightly beveled
Watch out for heavy oils. They glue the inner layers together and kill the swing.
22. Soft Wedge Cut With Volume Behind the Crown

The wedge cut has an old fashioned reputation, but the shape is smart for fine hair. It is stacked short at the nape and builds into volume just behind the crown.
The modern version is softer. The stacking is lighter and the top layers are longer, so it looks tousled rather than set.
Daily steps:
- Blow dry with your head tipped forward.
- Lift the back crown section with a small round brush.
- Pinch the top layers apart with a little wax.
A good pick for short hair with real height, especially if you want the back of your head to look rounded in photos.
23. Neck Length Nape Bob With a Blunt Back

Shoulder length thin hair has a habit of flipping in every direction, because it touches the shoulders and bends.
A nape bob ends higher, right at the neck, so nothing pushes against it. The back is cut blunt and level, and the front is a hair longer so it falls toward the jaw.
It is easy to wear, and it grows out into a lob without an awkward middle stage.
Small detail: ask your stylist to clean up the nape with scissors, not clippers. A soft edge at the neck looks fuller than a buzzed one.
Ends rest on the shoulders and flip out. The bottom inch looks see through in daylight, and the shape is gone by midday.
A blunt line sits at the neck with nothing to push it around. The ends lie flat, look solid, and keep a clean shape all day.
24. Tousled Ear Length Crop for Bedhead Texture

Five minutes before leaving, you run your fingers through it, twist a few bits, and walk out the door. That is life with a tousled crop.
The cut sits around the ears, with short irregular texture on top and along the hairline. Fine hair is light, so these little pieces stay lifted instead of collapsing.
Product cheat sheet:
- Matte paste for piecey texture
- Texture spray for grip on freshly washed hair
- Skip glossy pomades, which make fine hair look wet and thin
Bonus: it looks just as good after a nap.
25. Side Fringe Cut Only on the Part Side of Long Hair

A full fringe on long thin hair uses up a lot of the hair on top. A half fringe is the smart compromise.
The stylist cuts a few longer, angled pieces only on the side where you part. They sweep across the forehead toward the opposite temple and blend back into the lengths.
Why it helps:
- It adds bulk at the front, where people look first.
- It hides a wide part without changing your whole look.
- It grows out into a face framing piece within a few months.
Keep your part in the same spot every day, or the fringe will not fall right.
26. Collarbone Cut With Ends Snipped for Air Dry Bend

Fine straight hair that air dries tends to hang flat and stick straight down. A few small snips at the ends can change that.
Your stylist cuts the collarbone length with shallow point cutting at the very tips, so each section bends slightly as it dries. Nothing looks chopped. The hair just stops looking pin straight.
Air dry routine:
- Comb a light mousse through the roots
- Twist two front sections loosely
- Leave it alone until fully dry
Made for low effort days. The bend shows up even on hair that refuses to hold a curl.
27. Soft Shullet With a Fluffy Top
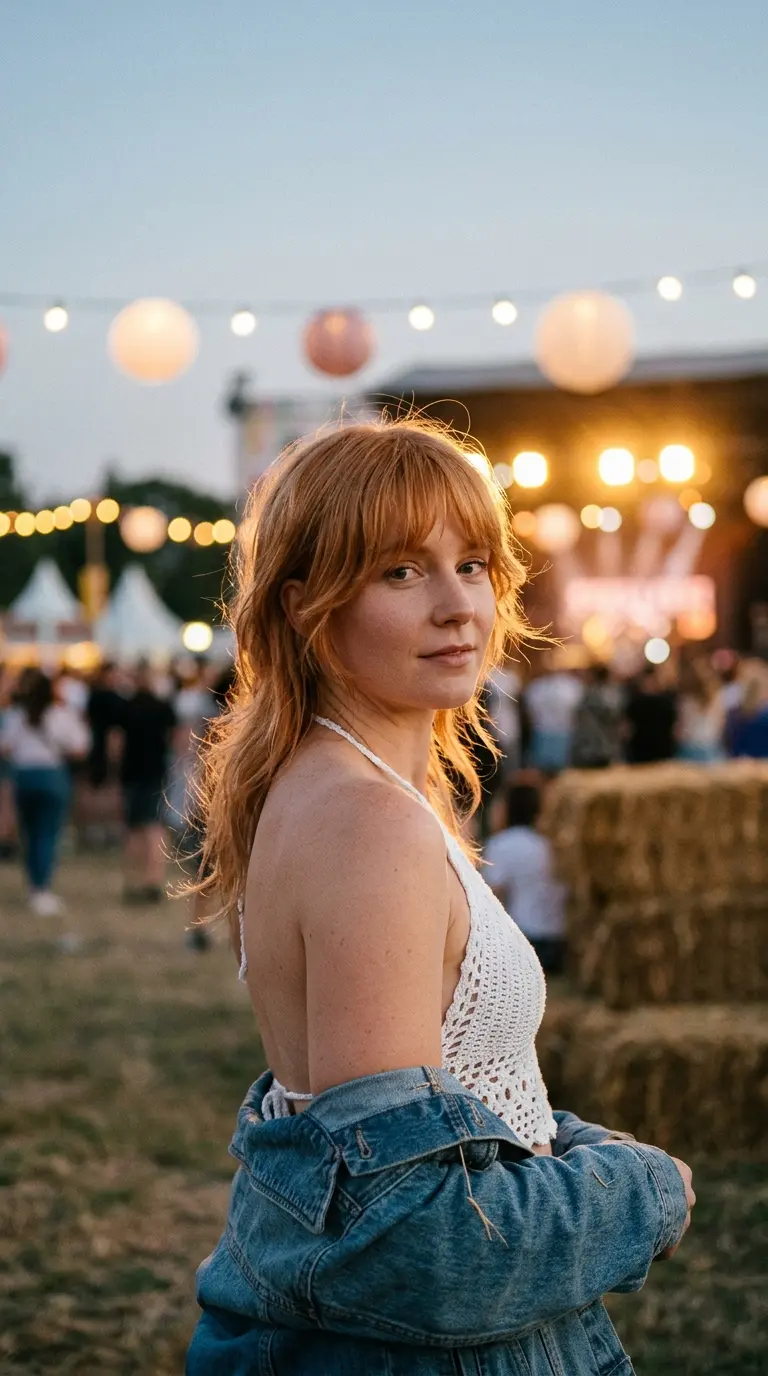
The shullet is half shag and half mullet, and it runs on one simple rule: most of the volume sits on top, and the back stays a bit longer.
For fine hair, that rule works well. Short, fluffy layers on top look full, while the longer back keeps the cut from feeling too cropped.
Ask for:
- Crown layers that stop around the eyebrows in front
- Sides tucked close but not shaved
- A back left just past the nape
Rough dry it upside down, work in a little texture spray, and shake it out. It is a cut for people who like their hair slightly wild.
The Right Cut Does the Heavy Lifting
Thin, fine hair is not hard to cut well. It just needs a stylist who protects the ends and puts shape where your hair goes flat. Blunt hems, crown lift, and smart bangs do more for fullness than any thickening shampoo on the shelf.
Pick one or two haircuts for thin fine hair from this list that match your length and your mornings. Show your stylist the photo, and say the words that matter most: no thinning shears, keep the weight at the bottom.
Then give it two or three washes to settle in. A new cut on fine hair often looks best around the second week.
Save this list to your hair board so it is ready the next time you book a trim.